


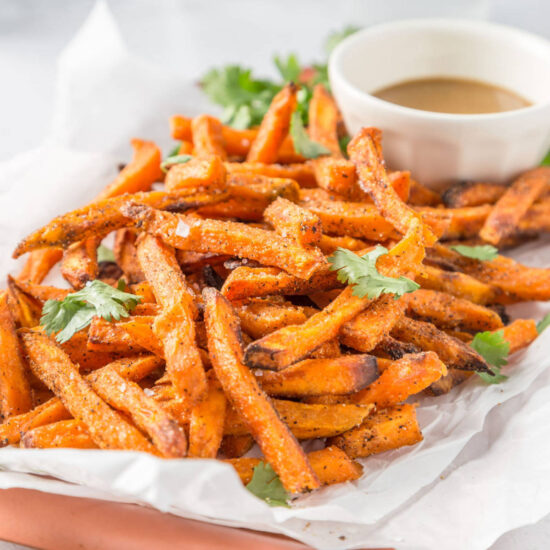
Baked Sweet Potato Slices


If you can slice a sweet potato and turn on an oven, you’re already 90% of the way to something seriously good. These baked sweet potato slices are golden and caramelized on the outside, soft and slightly sweet on the inside, and so easy they practically make themselves. No fancy techniques, no unnecessary steps—just a simple, foolproof method that guarantees crispy-edged, deeply flavorful healthy sweet potatoes every single time.
And the best part? They go with literally everything. Pile them onto grain bowls, pair them with your favorite dips, or serve them up as the perfect side-dish-that-accidentally-steals-the-show. They’re wholesome without trying too hard, naturally delicious with just the right amount of seasoning, and so simple you’ll wonder why you haven’t been making them every week. (Spoiler: that’s about to change.)
Why You’ll Love This Recipe
There are a lot of ways to roast sweet potatoes, but this recipe? Peak simplicity, peak deliciousness. Whether you’re a meal prep pro or just trying to get something good on the table with minimal effort, these caramlized sweet potato slices are about to become your new go-to. Here’s more reasons you’ll love them:
- No fuss, no stress: Just slice, season, and bake. That’s it. No flipping, no babysitting, just perfectly golden, lightly caramelized sweet potatoes straight from the oven.
- Ridiculously versatile: Toss them into grain bowls, pile them on salads, serve them next to your favorite mains, or snack on them straight off the pan. They just work.
- The perfect balance: Lightly crisp on the edges, soft in the center, a little sweet, a little savory, and a whole lot of flavor in every bite.
Once you try them, you’ll get it. And you might just start making a double batch on autopilot!
Key Ingredients
You only need a handful of simple, pantry-friendly ingredients to make these perfectly roasted, slightly caramelized sweet potato slices. No complicated spice blends, no hard-to-find oils—just a few essentials that let the natural sweetness of the potatoes shine. Here’s what you’ll need:
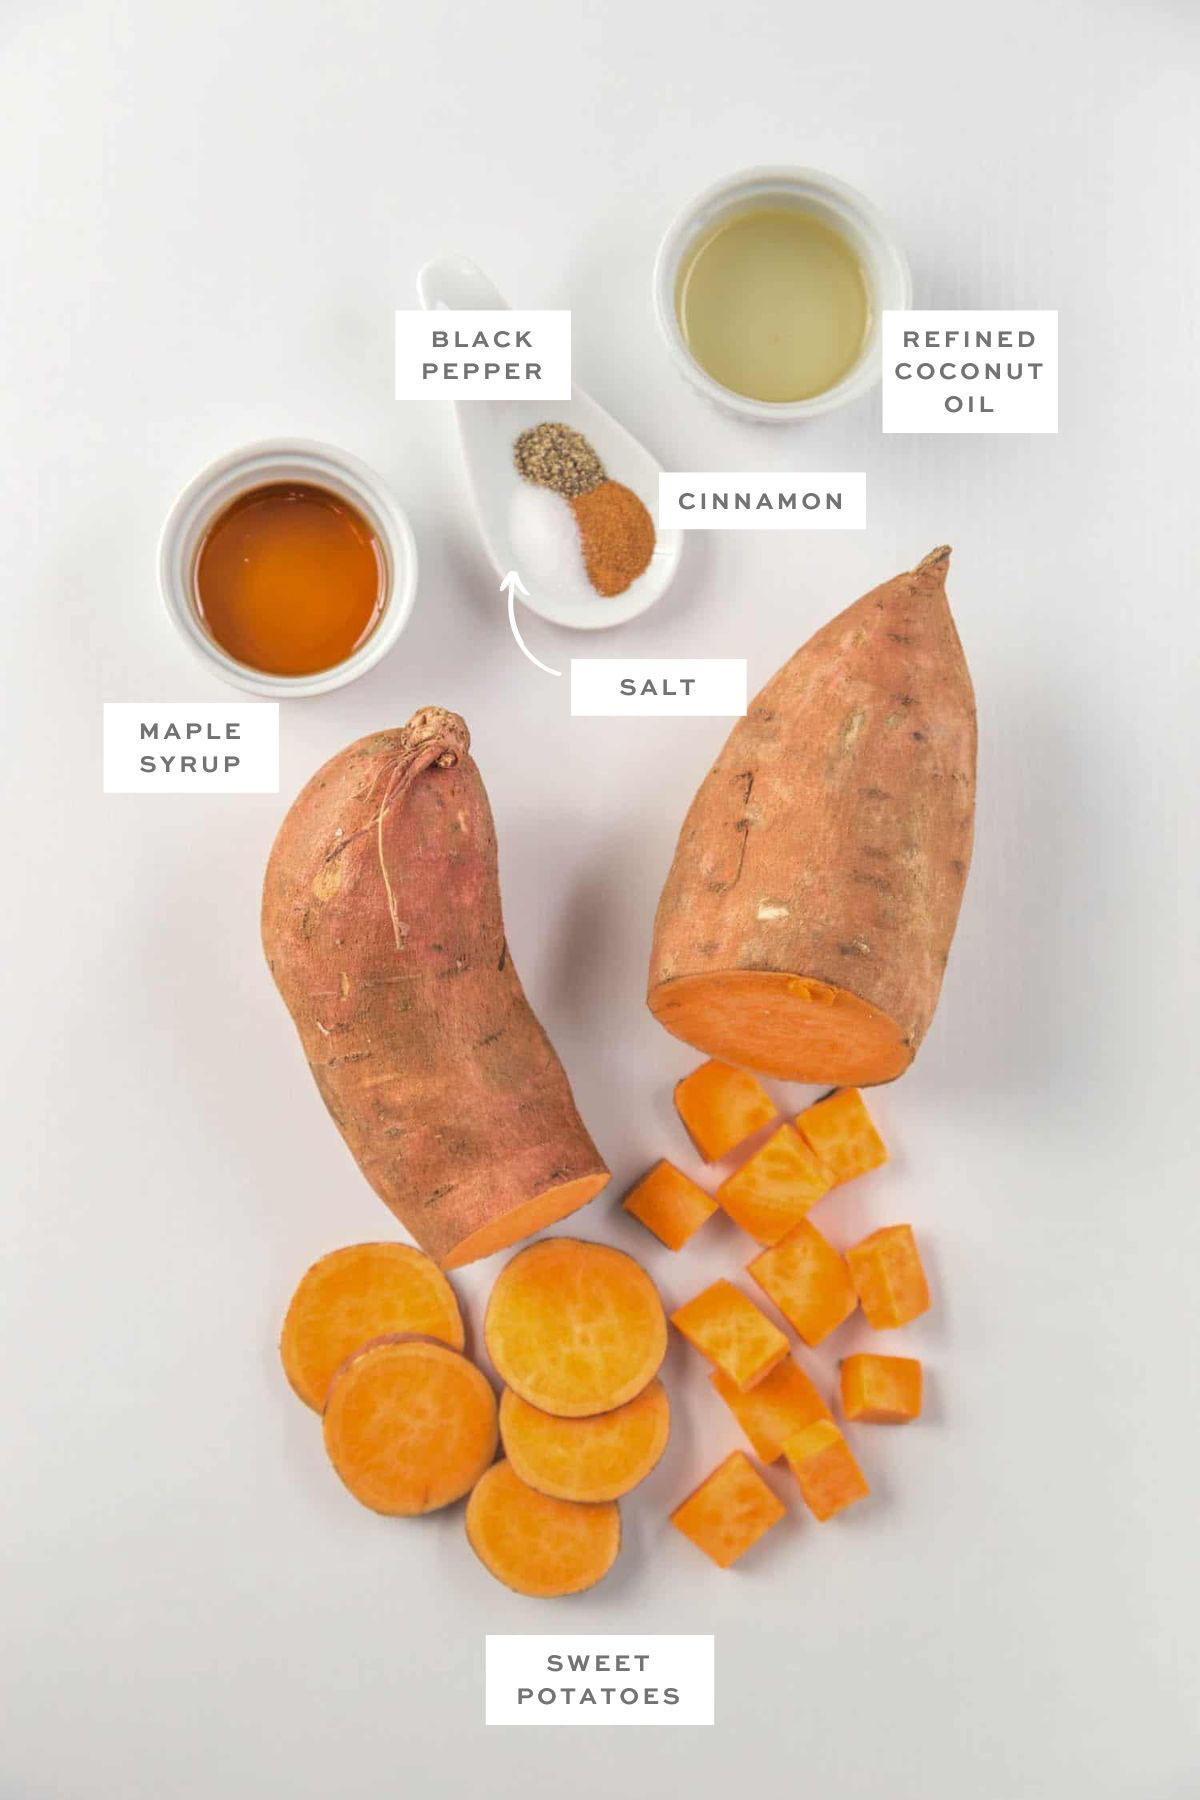
- Sweet Potatoes: The best kind for roasting? Jewel or garnet sweet potatoes. They have that deep orange color and get beautifully soft on the inside with caramelized edges. (Skip white or purple varieties for this one—trust us, the texture just isn’t the same.)
- Refined Coconut Oil: A neutral-flavored oil that helps the slices roast evenly without overpowering their natural sweetness. No coconut oil? Avocado oil works too! Olive oil is an option, but it has a stronger flavor.
- Maple Syrup: Just a touch! This helps the slices develop those golden, caramelized edges without turning them into dessert.
- Salt, Cinnamon & Black Pepper: The perfect balance of savory and warm. Salt brings out the richness, cinnamon adds a cozy hint of spice, and black pepper gives it a little contrast.
Easy Ways To Switch Up The Flavor
This recipe is already magic as-is, but if you’re in the mood to mix things up, here are a few fun ways to play with the flavors while keeping that perfectly caramelized goodness:
- Savory Twist: Swap the cinnamon for smoked paprika or garlic powder for a deeper, more umami-forward flavor. A sprinkle of flaky salt at the end? Chef’s kiss.
- Spicy-Sweet: Add a pinch of cayenne or red pepper flakes to balance the natural sweetness with a little heat.
- Extra Cozy: Lean into the warm spices with a dash of nutmeg or ginger for even more fall-inspired goodness.
- Zesty Upgrade: A squeeze of fresh lime juice or a little lemon zest after roasting brightens up the flavors beautifully.
- Crunch Factor: Sprinkle with toasted pecans or walnuts right before serving for a bit of texture.
However you tweak them, the base recipe is a foolproof winner. Just don’t skimp on that maple syrup—it’s the secret to those perfectly caramelized edges!
How To Make
This is as easy as it gets—no fancy techniques, no complicated steps. Just slice, season, and bake. Here’s the game plan for perfectly golden, caramelized, and slightly crispy sweet potatoes. For full recipe details, scroll to the end of this post!
- Step 1: Slice ‘em up – Peel and cut your sweet potatoes into even slices (about ½-inch thick) so they cook evenly.
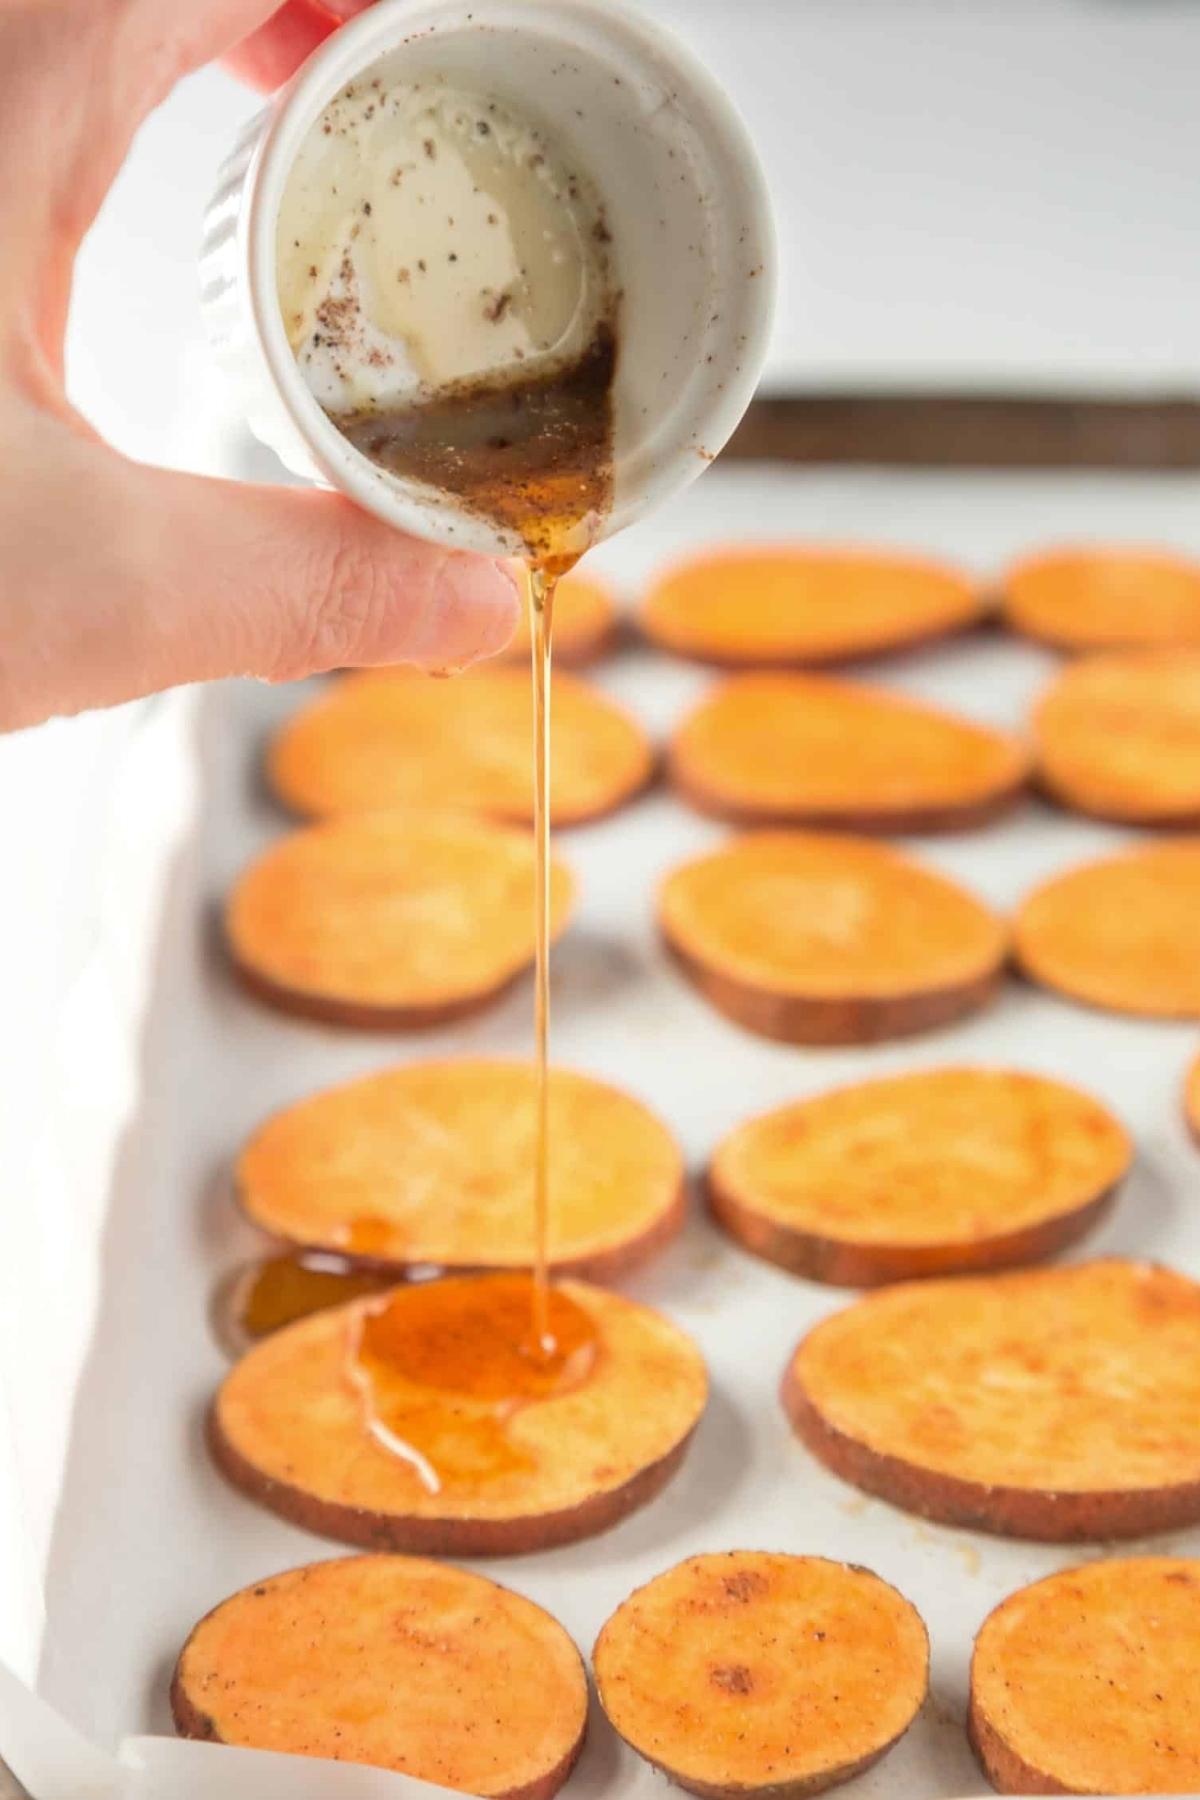
- Step 2: Toss in flavor – Coat them with coconut oil, a touch of maple syrup, and a simple blend of salt, cinnamon, and black pepper for the perfect balance of sweet and savory.
- Step 3: Spread them out – Arrange in a single layer on a baking sheet (no crowding = crispy edges!).
- Step 4: Roast to perfection – Pop them in a 425°F oven for about 30–35 minutes, flipping once for even browning.
- Step 5: Serve! Enjoy them however you want – On bowls, as a side, or straight from the pan. No wrong answers here.

How To Serve
Golden, slightly crisp, and caramelized to perfection—these golden sweet potato slices are basically the MVP of meal prep. Whether you’re looking for a simple side dish, an easy snack, or a way to bulk up your bowl game, these slices just work. Here’s how to put them to good use:
- Toss them in a salad: Warm or cold, they add a little sweetness and heartiness to grain bowls, leafy greens, or a big chopped salad.
- Perfect bowl booster: Pile them onto a hearty bowl with steamed rice, quinoa, chickpeas, roasted veggies, and your favorite plant-based protein for an easy, balanced meal.
- Tuck them into sandwiches or wraps: Layer them into a wrap with pita bread, hummus, avocado, and greens for a ridiculously good plant-based lunch.
- Snack attack! Dip them in tahini dressing, cashew queso, guacamole, or your go-to sauce for a simple, satisfying snack.
- Brunch Goals: Pair them with scrambled tofu and a side of crispy tempeh bacon.
FAQs
For ½-inch thick slices, bake at 425°F for 30–35 minutes, flipping them halfway through. This ensures they’re soft on the inside with lightly caramelized edges. If your slices are thinner, they’ll cook faster—start checking around the 25-minute mark.
The key is high heat and proper spacing. Arrange the slices in a single layer on a baking sheet, toss with a little oil and seasoning, and bake at 425°F until golden and tender. If you want crispier edges, use a stainless steel pan instead of parchment paper.
Peeling is totally optional! Leaving the skin on adds texture, fiber, and a slightly earthy flavor, while peeling gives you a softer, smoother bite. If your sweet potatoes have thin, clean skin, go ahead and roast them as-is. Just give them a good scrub first!

More Sweet Potato Recipes To Try


If you make this baked sweet potato slices recipe, please leave a star rating and let me know what you think in the comments below! I love reading your comments!

Baked Sweet Potato Slices
Ingredients
- 2 medium-sized sweet potatoes, chopped into ½ inch thick chunks, (about 1 lb)
- 2 tablespoons refined coconut oil
- 1 teaspoons maple syrup, I use Grade A Dark
- ¼ teaspoon salt
- ¼ teaspoon ground cinnamon
- ⅛ teaspoon black pepper
Instructions
- Preheat oven to 425º F (218º C).
- In a large bowl, combine coconut oil, maple syrup, salt, cinnamon, and black pepper. You may need to melt your coconut if it’s solid!
- Put chopped or sliced sweet potatoes into a large bowl and toss around until well-coated with mixture.
- Transfer coated sweet potatoes onto a baking sheet and spread out evenly.
- Put potatoes into the oven for 30-35 minutes, turning over at the halfway mark with tongs or a spatula.
- Once the potatoes are finished, remove from the oven, allow to cool, and enjoy!
Notes
- How to Store: Let your golden sweet potato slices cool completely before storing them in an airtight container in the fridge for up to 5 days. They hold up beautifully for meal prep and taste just as good cold as they do warm!
- Oven (Best for Crispy Edges): Bake at 400°F for 5–10 minutes to revive those caramelized edges.
- Air Fryer (Quick & Crispy): Heat at 375°F for 3–5 minutes for a fresh-from-the-oven feel.
- Microwave (Fastest Option): Zap for 30 seconds to 1 minute—they’ll be softer but still delicious.
- Use a stainless steel baking sheet for better caramelization—parchment paper can make them softer.
- For crispier edges, don’t overcrowd the pan. Give each slice space to roast properly.
- Want a flavor boost? Try a pinch of smoked paprika for savory depth or cayenne for heat.
- Don’t skimp on the oil! A light coating helps with caramelization and prevents dryness.
Nutrition
You may also like...


Enter to Win Our Monthly Giveaway!
New winner every month! Drop your name below for a chance to win hundreds of dollars of vegan prizes from our brand partners. You’ll also receive our weekly e-newsletter with plant-based recipes galore!
Leave a Comment
I love sweet potatoes these look so good!!
These roasted sweet potato slices are sooo good on grain bowls and even salads! Super easy too. Great recipe!
Loveee these potatoes so much! They’re came out so so good!
These sweet potato slices are incredible! Amanda, you shared the BEST recipe! Yummy!
What a great and healthy snack! They were so easy to make.
Easy and delicious!! We make these a lot and enjoy them w grilled tofu on sandwiches and salads. Yum.
These are SOOOO GOOD!!! I can’t get enough!
YAY! 🙂