


















How to Grow Sprouts at Home: The Ultimate Beginner’s Guide to Sprouting

Did you know you can grow your own fresh, crunchy, nutrient-rich greens right on your kitchen counter—in just a few days? No garden, soil, or sunshine required!
Growing sprouts at home is one of the easiest ways to bring a little fresh food into your kitchen. All you need are sprouting seeds, a jar, water, and a couple of minutes each day. Before you know it, a small scoop of seeds can transform into a jar full of sprouts ready to enjoy.
And there’s so much more to sprouting than the classic alfalfa sprouts you may have seen on sandwiches. From broccoli and radish to lentils and mung beans, you can grow all kinds of sprouts with different flavors, textures, and uses.
In this guide, we’ll walk through exactly how to grow sprouts at home, which seeds to choose, how long to soak and grow them, and how to avoid common sprouting mistakes. You’ll also find an easy sprouting chart you can bookmark for your next batch.
What Are Sprouts?
Sprouts are seeds that have just started growing into plants. When you soak a viable seed in water, it begins to germinate, sending out a tiny root and eventually a shoot.
Instead of planting the seed in soil and waiting for it to mature, you harvest the sprout while it’s still young.
You can grow sprouts from many types of seeds, beans, and legumes, including broccoli, alfalfa, radish, lentils, and mung beans.
Sprouts are different from microgreens, which are typically grown in a growing medium and harvested by cutting the stems above the roots. With sprouts, the seed, root, and shoot are generally harvested together.
Why Grow Your Own Sprouts?
- They’re incredibly easy to grow. No gardening experience necessary.
- You don’t need a garden. A small spot on your kitchen counter is enough. No soil, no sun, just water and a few days.
- They’re ready in days, not months. Some varieties are ready in just 2–4 days, while others take closer to a week.
- You can grow them year-round. Even in the middle of winter!
- They add variety to everyday meals. Choose mild, crunchy, peppery, or slightly sweet sprouts.
- They’re a fun way to connect with your food. There’s something pretty magical about watching a handful of seeds come to life.
Growing sprouts can also be an economical way to enjoy fresh greens, depending on the cost of your seeds, equipment, and finished yield.
What Do You Need to Grow Sprouts?
You only need a few simple supplies to get started.
1. Sprouting Seeds
Start with seeds specifically sold for growing edible sprouts.
Not all seeds are appropriate for sprouting. Garden seeds may be treated with chemicals or handled differently from seeds intended for food, and ordinary dried beans from the grocery store may not have been selected or tested for sprouting.
For beginners, broccoli, alfalfa, radish, and prepackaged salad sprouting mixes are all popular choices.
The highest quality sprouting seeds we know of are from The Sprouting Company—they offer everything from broccoli sprouts to crunchy lentils to fun protein mixes.
Important: Choose seeds from a reputable edible-sprouting supplier that provides information about its food-safety practices. Even seeds intended for sprouting are not guaranteed to be free of harmful bacteria.
2. A Sprouting Jar
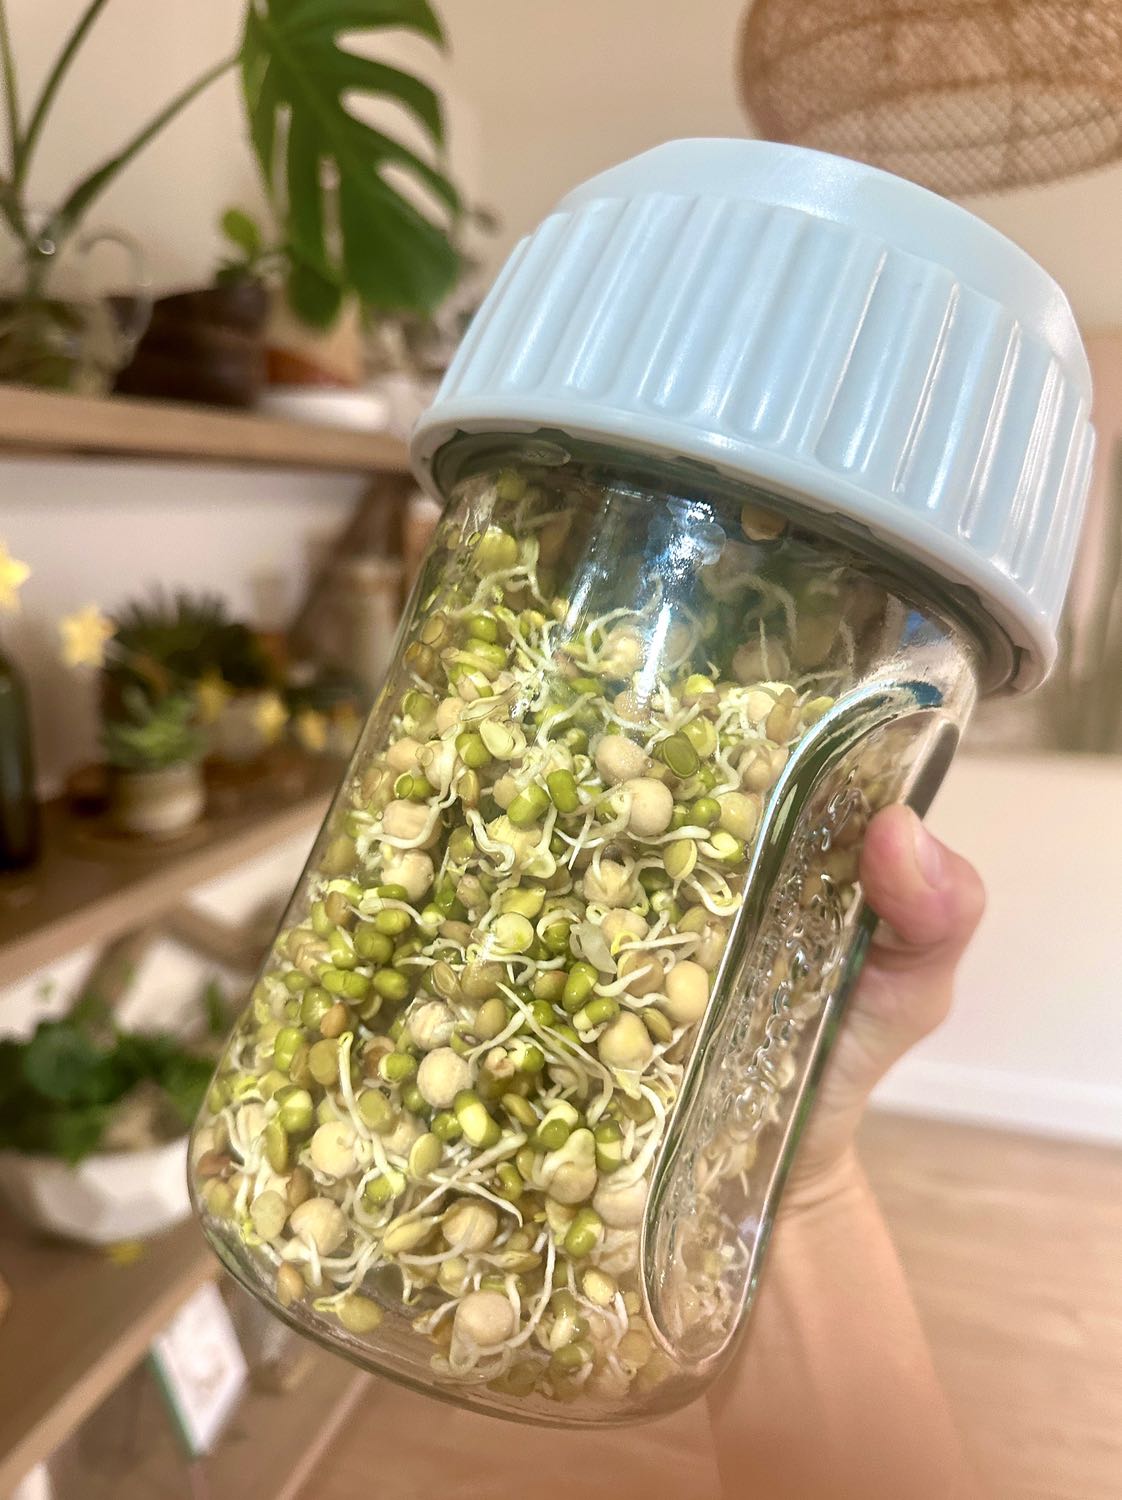
You can grow sprouts in a clean, wide-mouth glass jar fitted with a food-safe mesh sprouting lid. The mesh allows you to rinse the seeds and drain away water while keeping everything inside.
A dedicated sprouting system makes the process more convenient, especially when it comes to drainage.
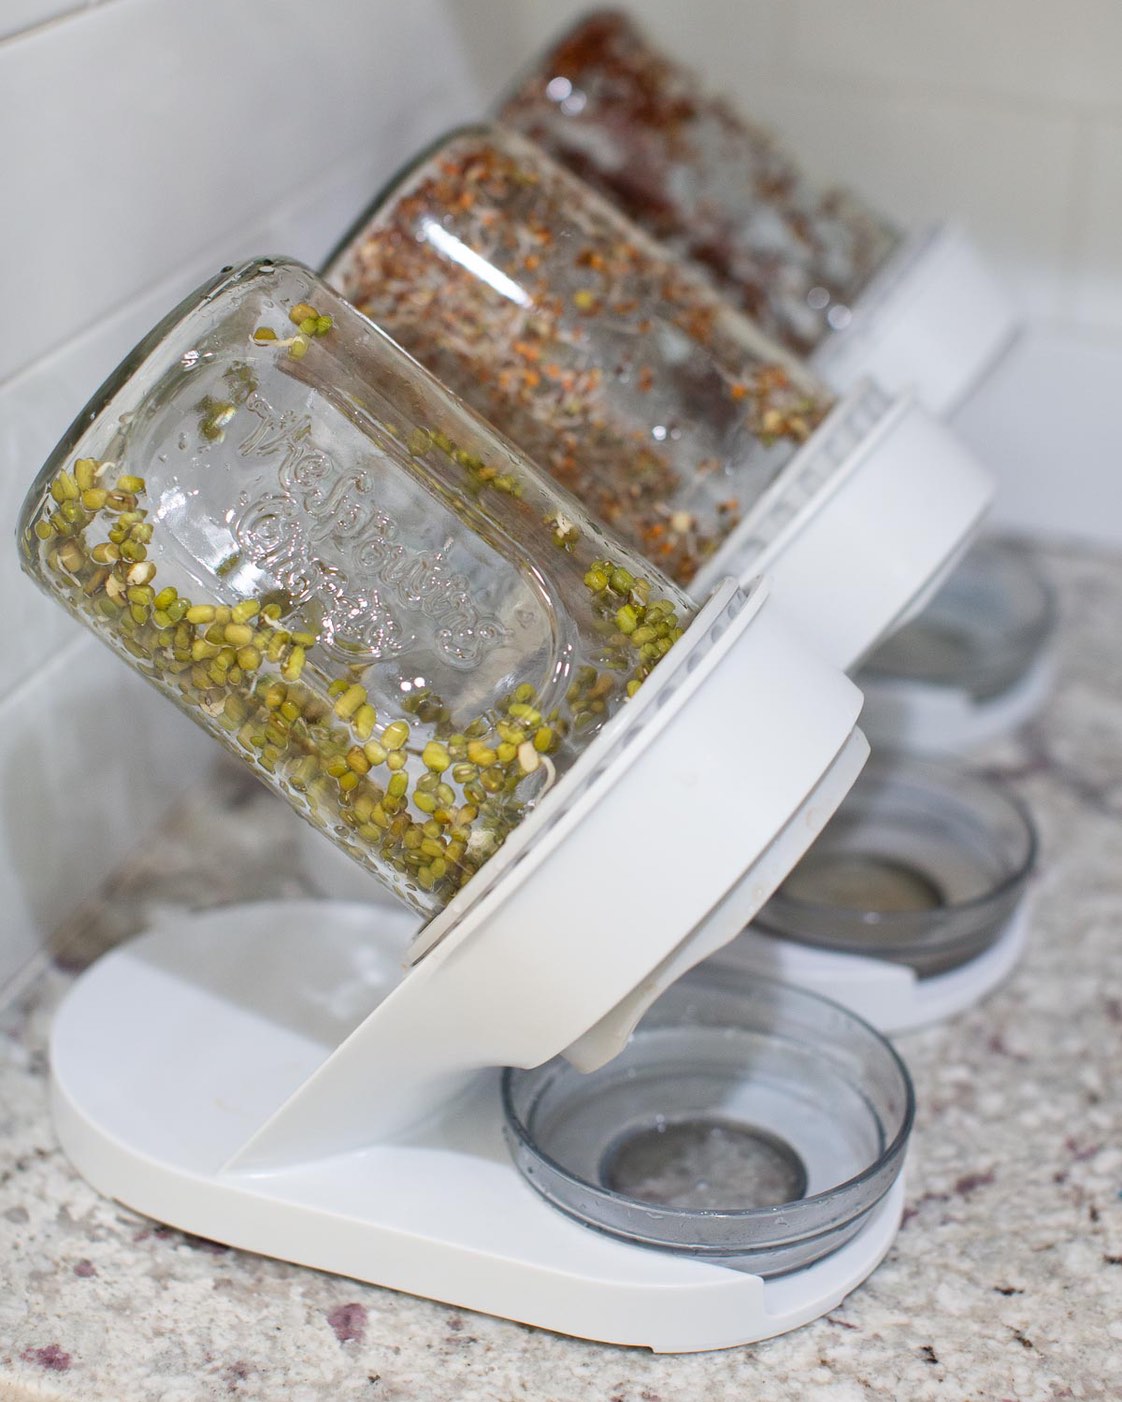
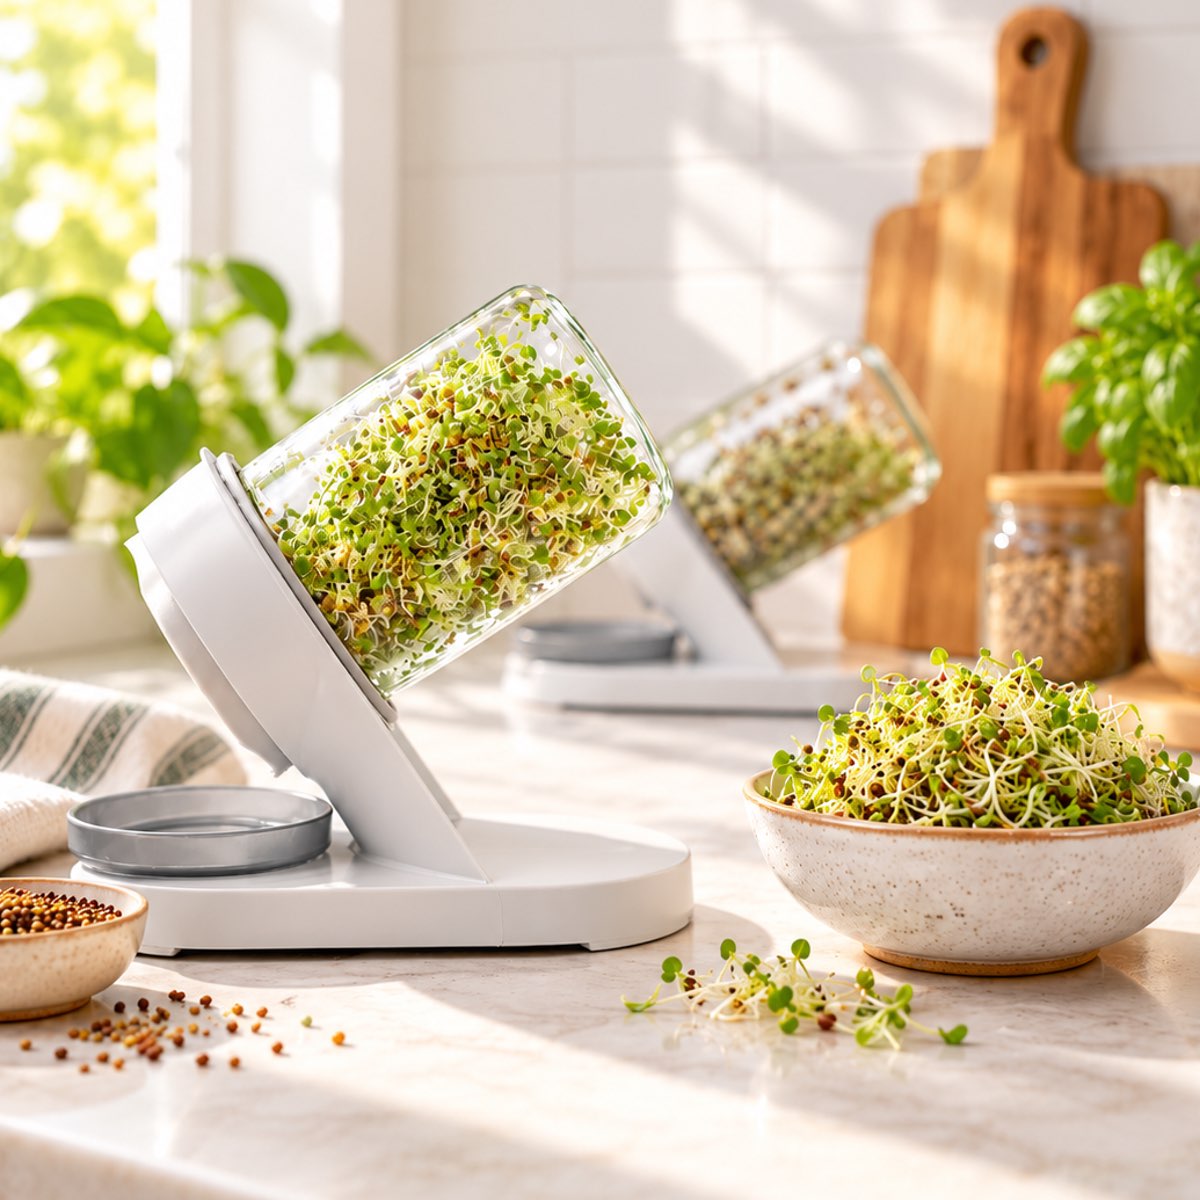
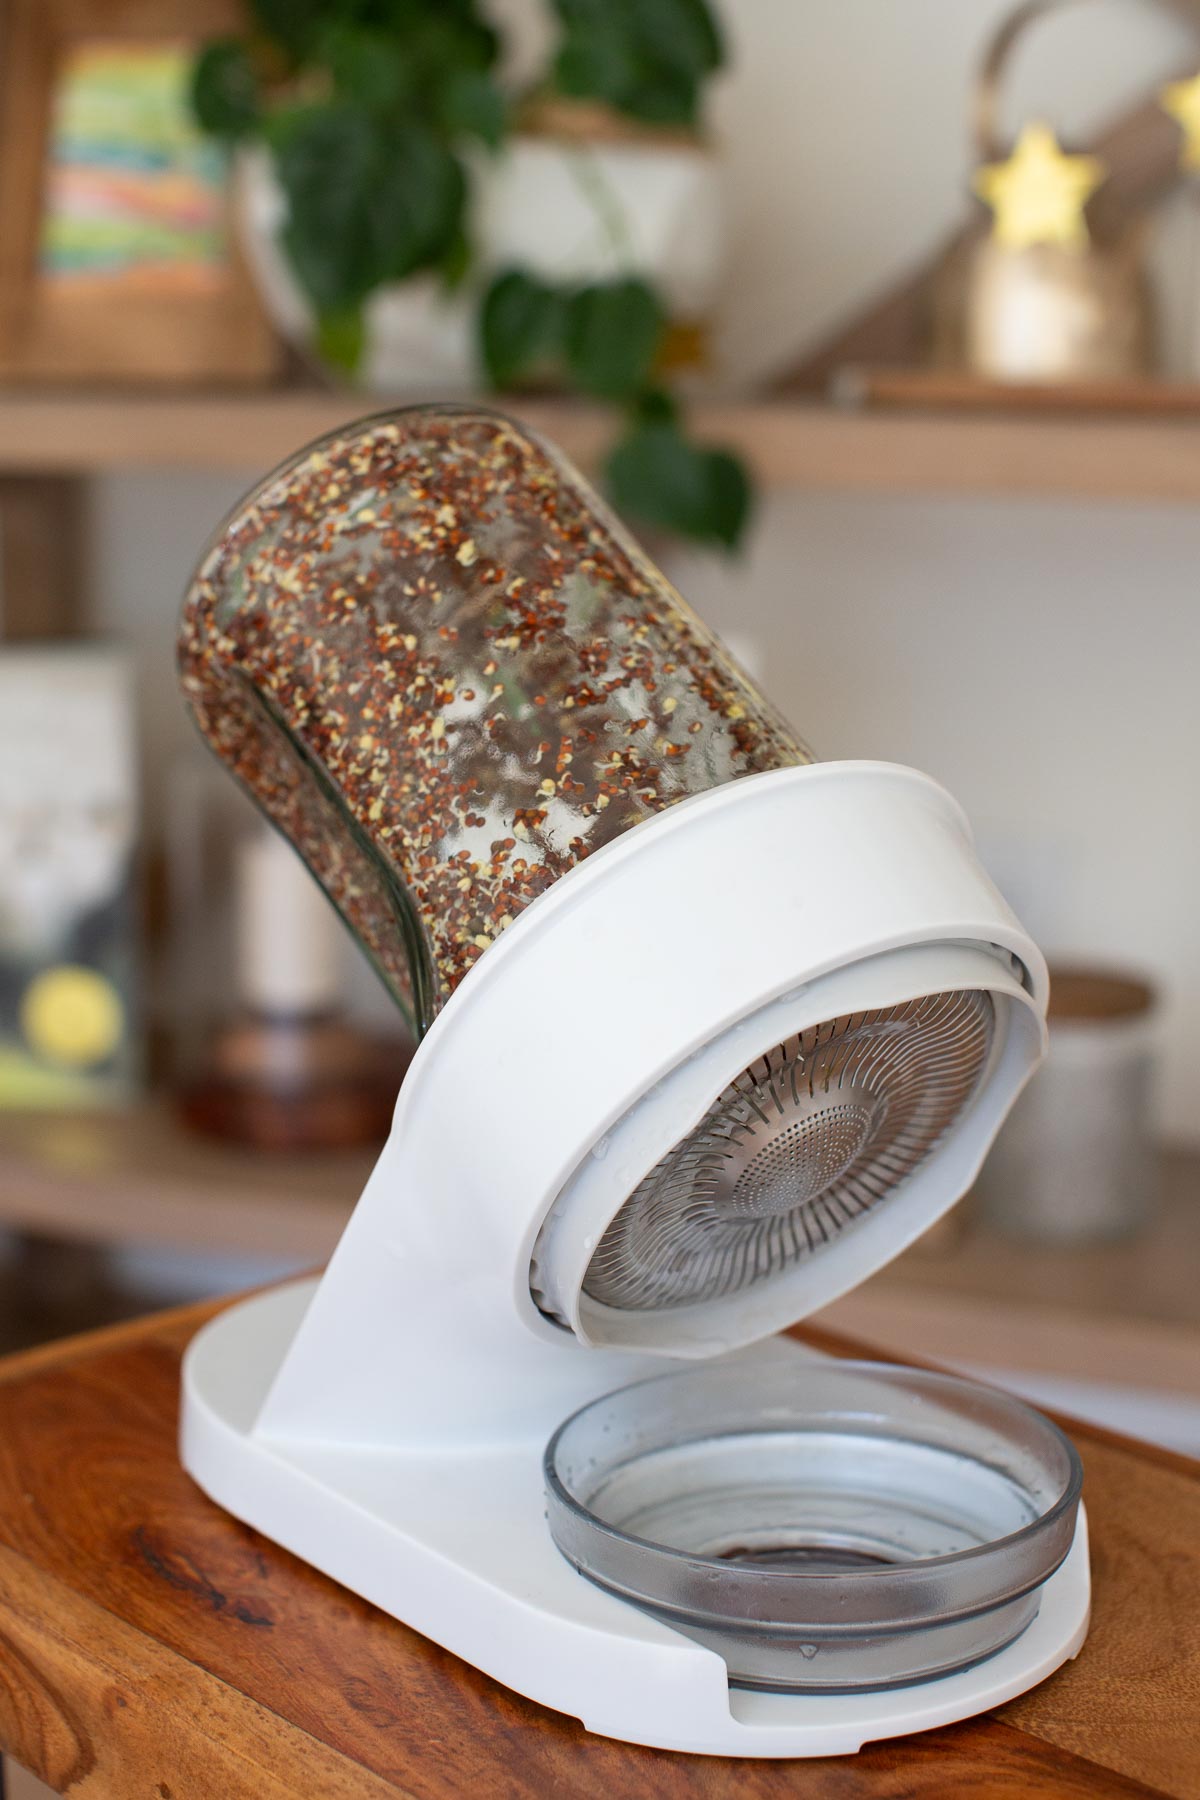
We’re using The Sprouting Company’s Sprouter, which includes a glass growing jar, stainless steel filter, angled stand, and removable drip tray.
The angled design is particularly helpful because sprouts need moisture to grow, but they shouldn’t sit in a puddle of water between rinses.
3. Clean Water
You’ll use potable water to soak your seeds initially and rinse them as they grow.
That’s it! No potting soil, fertilizer, grow lights, or special gardening tools required.
How to Grow Sprouts in a Jar (Step by Step)
Once you understand the basic process, growing sprouts is wonderfully simple.
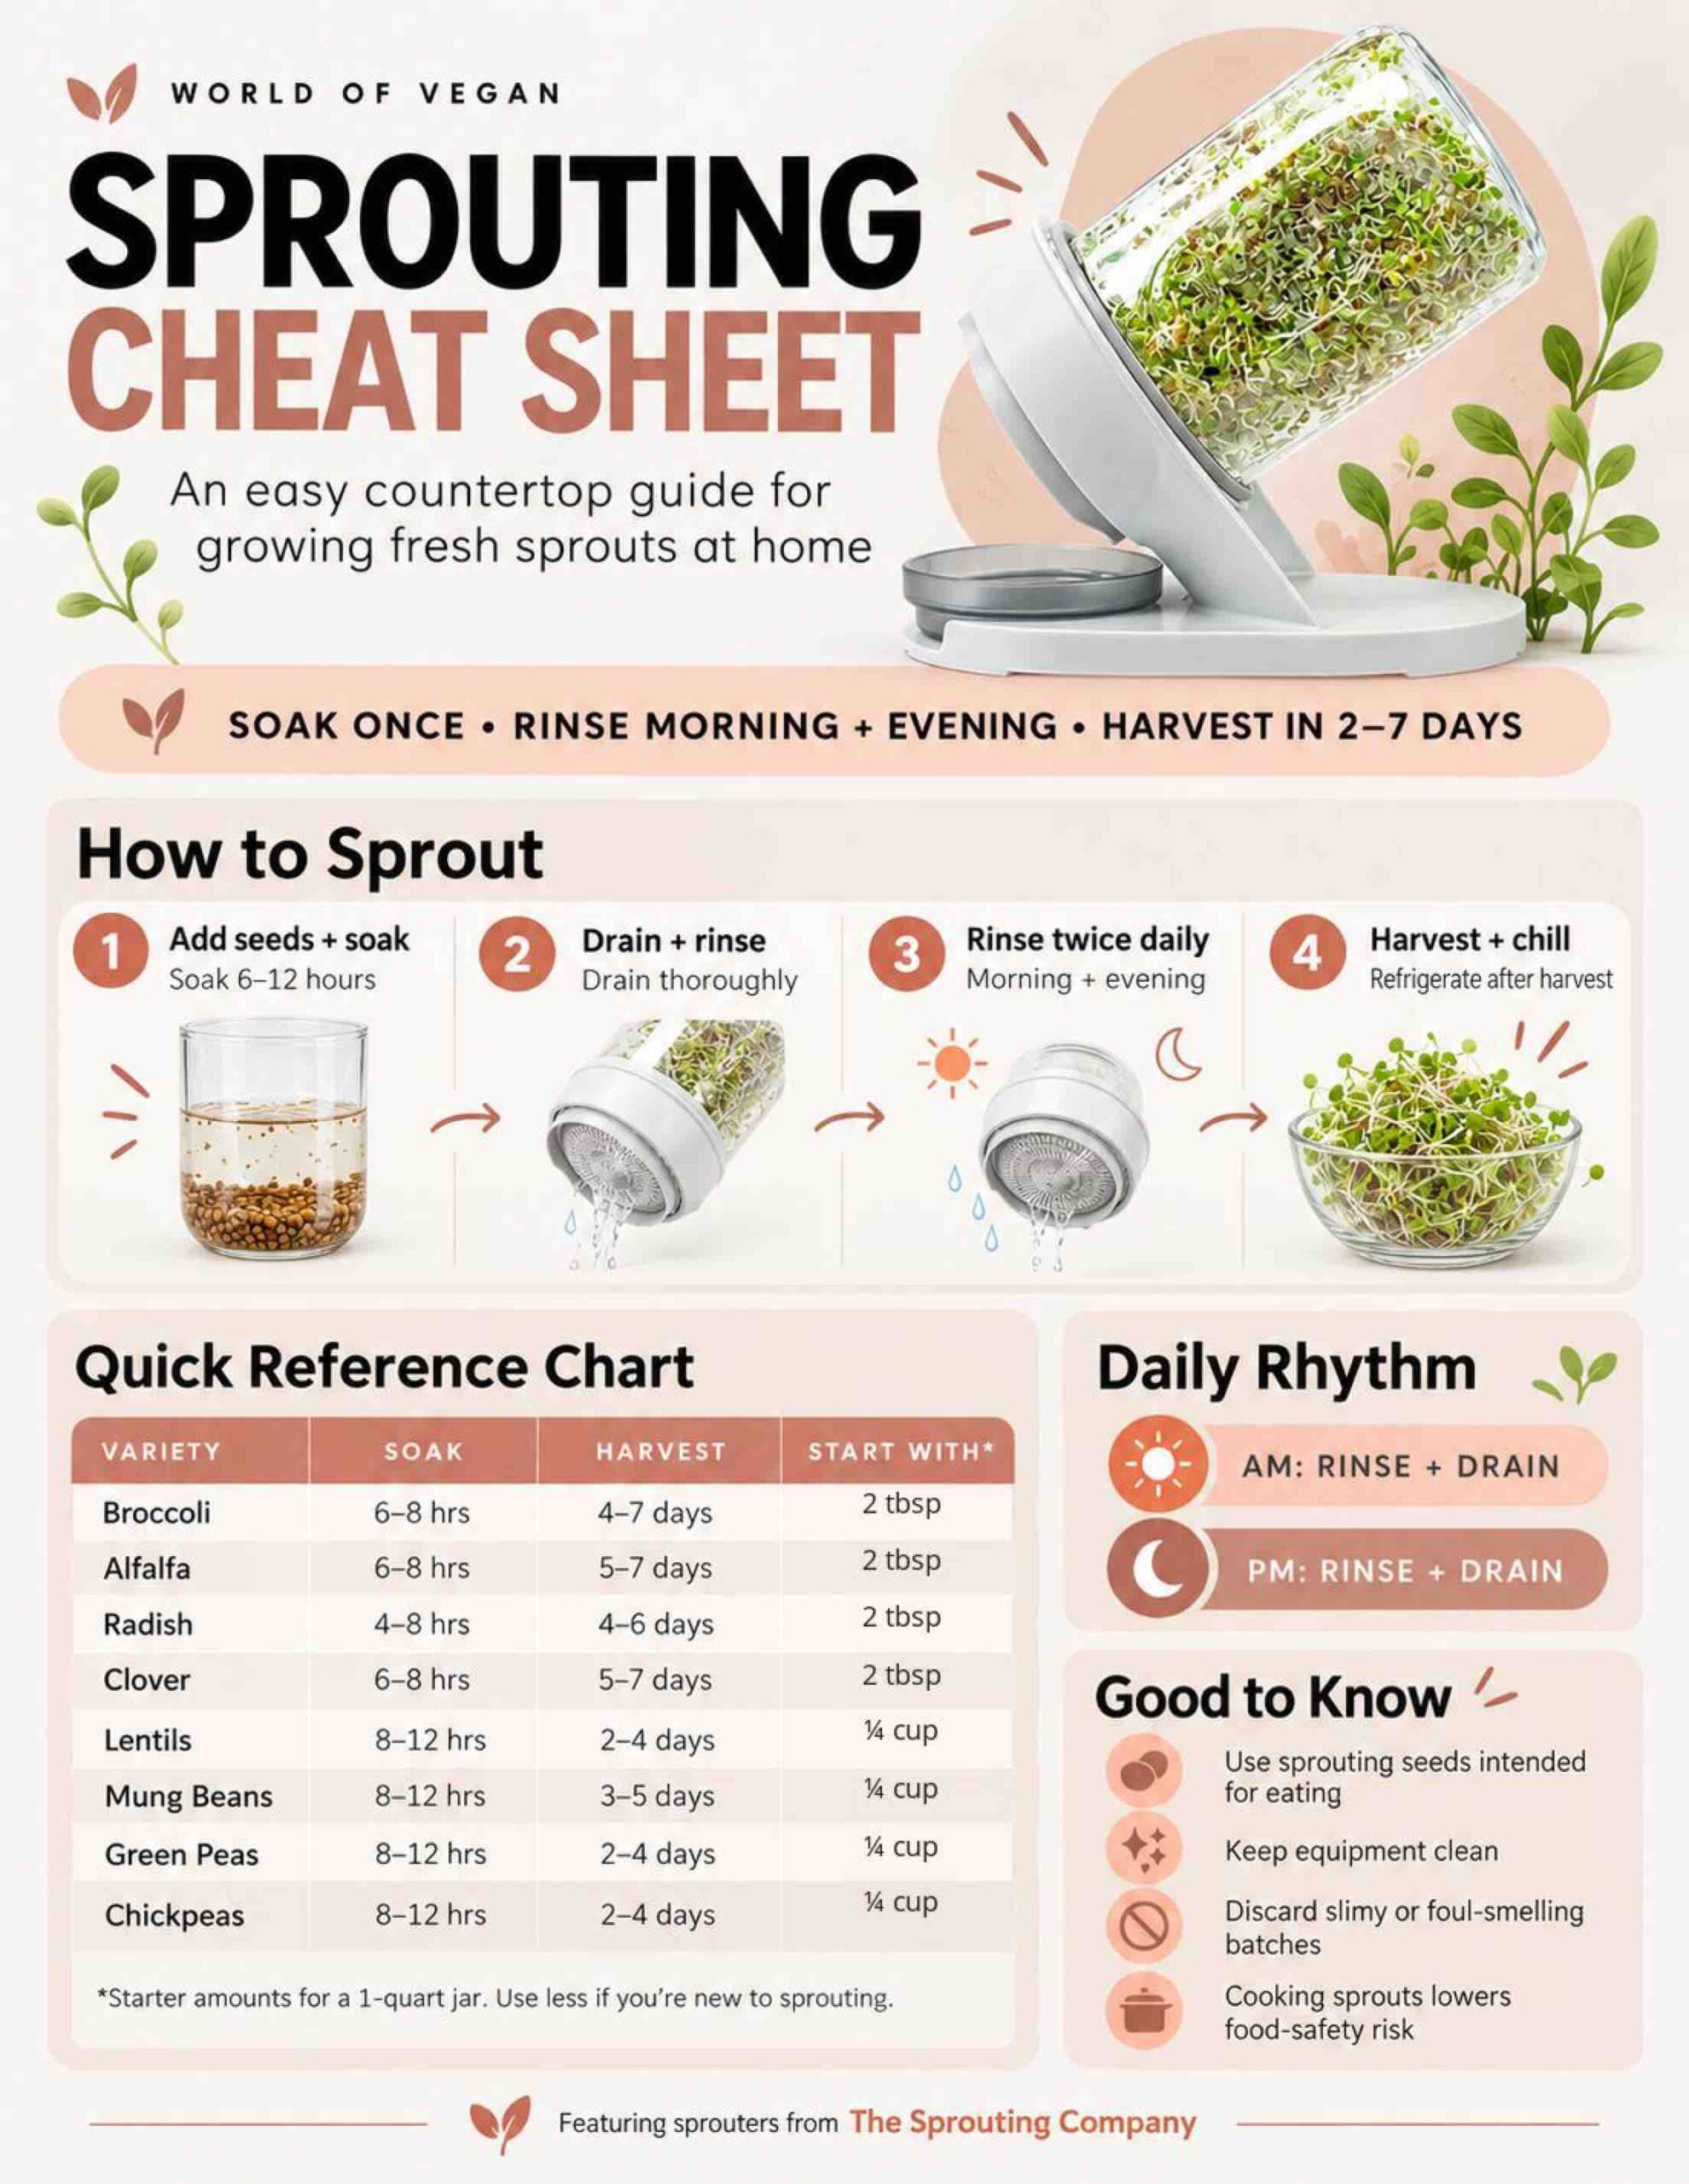
The routine: Soak once, then rinse and drain twice a day until harvest.
Step 1: Add Your Sprouting Seeds
Start with a clean sprouting jar and measure in your seeds.
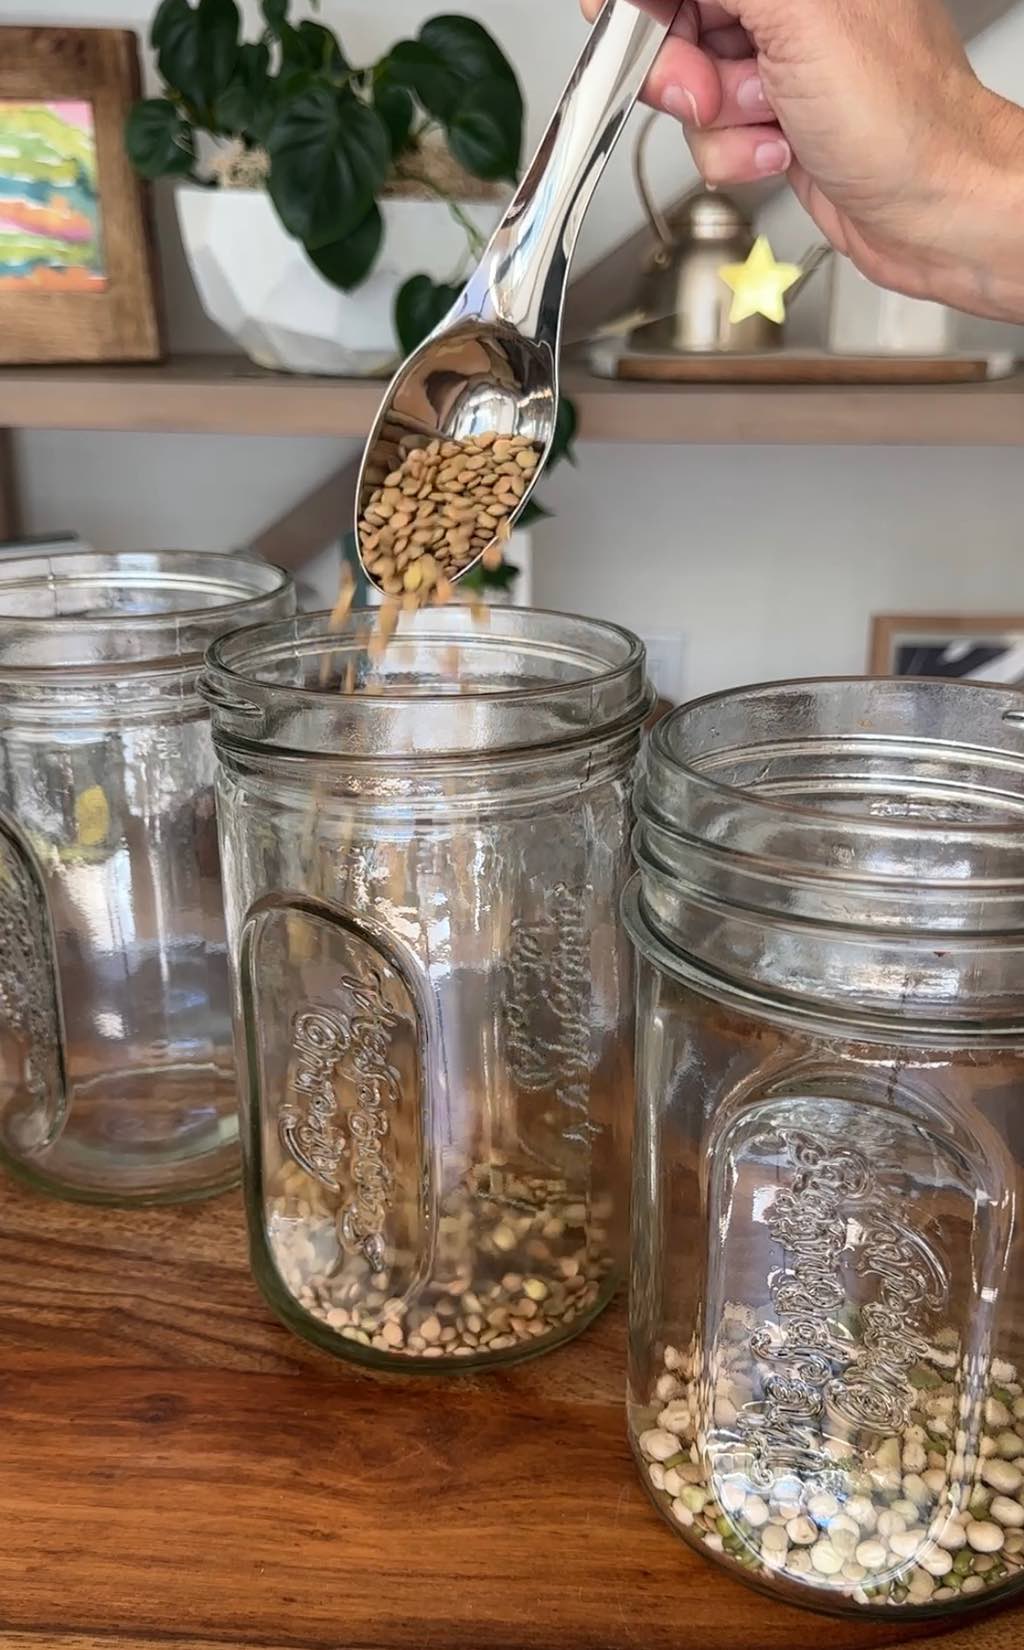
The amount depends on the variety and size of your jar. Small seeds, like broccoli and alfalfa, expand dramatically as they grow, so you need far less dry seed than you might expect.
For a 1-quart mason jar, try starting with 1 tablespoon of small sprouting seeds while you learn how much space they need.
The Sprouting Company’s larger, 55-ounce sprouter is designed for bigger batches, and the company recommends about ¼ cup of small leafy seeds for many of its varieties.
Step 2: Soak the Seeds
Cover the seeds generously with cool, clean water, giving them plenty of room to expand.
For many common sprouting seeds, an overnight soak of approximately 8 hours works well. Some varieties prefer shorter or longer soaking times, so always follow the instructions for your particular seeds.
This initial soak hydrates the seeds and begins the germination process.
Step 3: Drain and Rinse
After soaking, drain away all the soaking water.
Add fresh water, gently swirl to rinse the seeds, and drain thoroughly again.
This is one of the most important habits in sprouting: Keep the seeds hydrated, but don’t leave them sitting in water.
With a standard mason jar and mesh lid, place the jar at an angle, opening downward, in a clean, well-ventilated spot where excess water can drain safely.
The Sprouting Company’s sprouter has a built-in angled stand that holds the jar in its draining position.
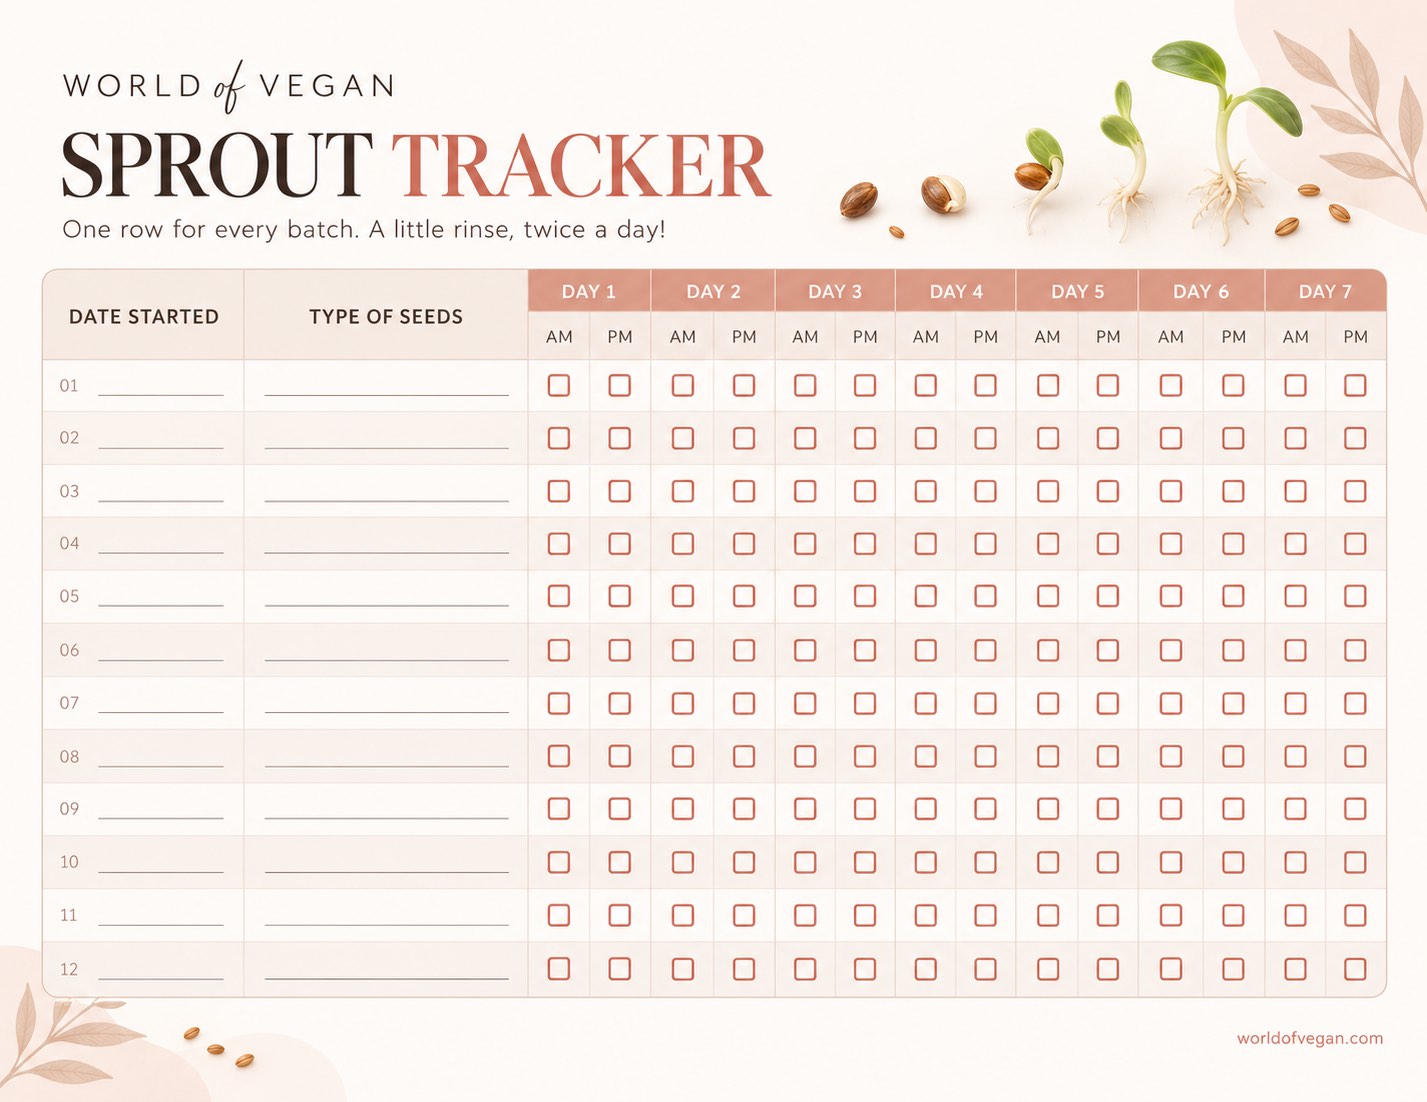
Step 4: Rinse Twice a Day
Each morning and evening, give the sprouts a thorough rinse with fresh water and drain completely.
That’s your daily sprouting routine!
Keep the jar at a comfortable room temperature, away from excessive heat and direct sunlight. A bright room is fine, but sprouts don’t need a sunny windowsill to germinate.
Over the next few days, you’ll see tiny roots appear, followed by shoots and, with some varieties, little green leaves.
Be sure to maintain clean equipment and good airflow throughout the process.
Step 5: Harvest Your Sprouts
Harvest time depends on the variety.
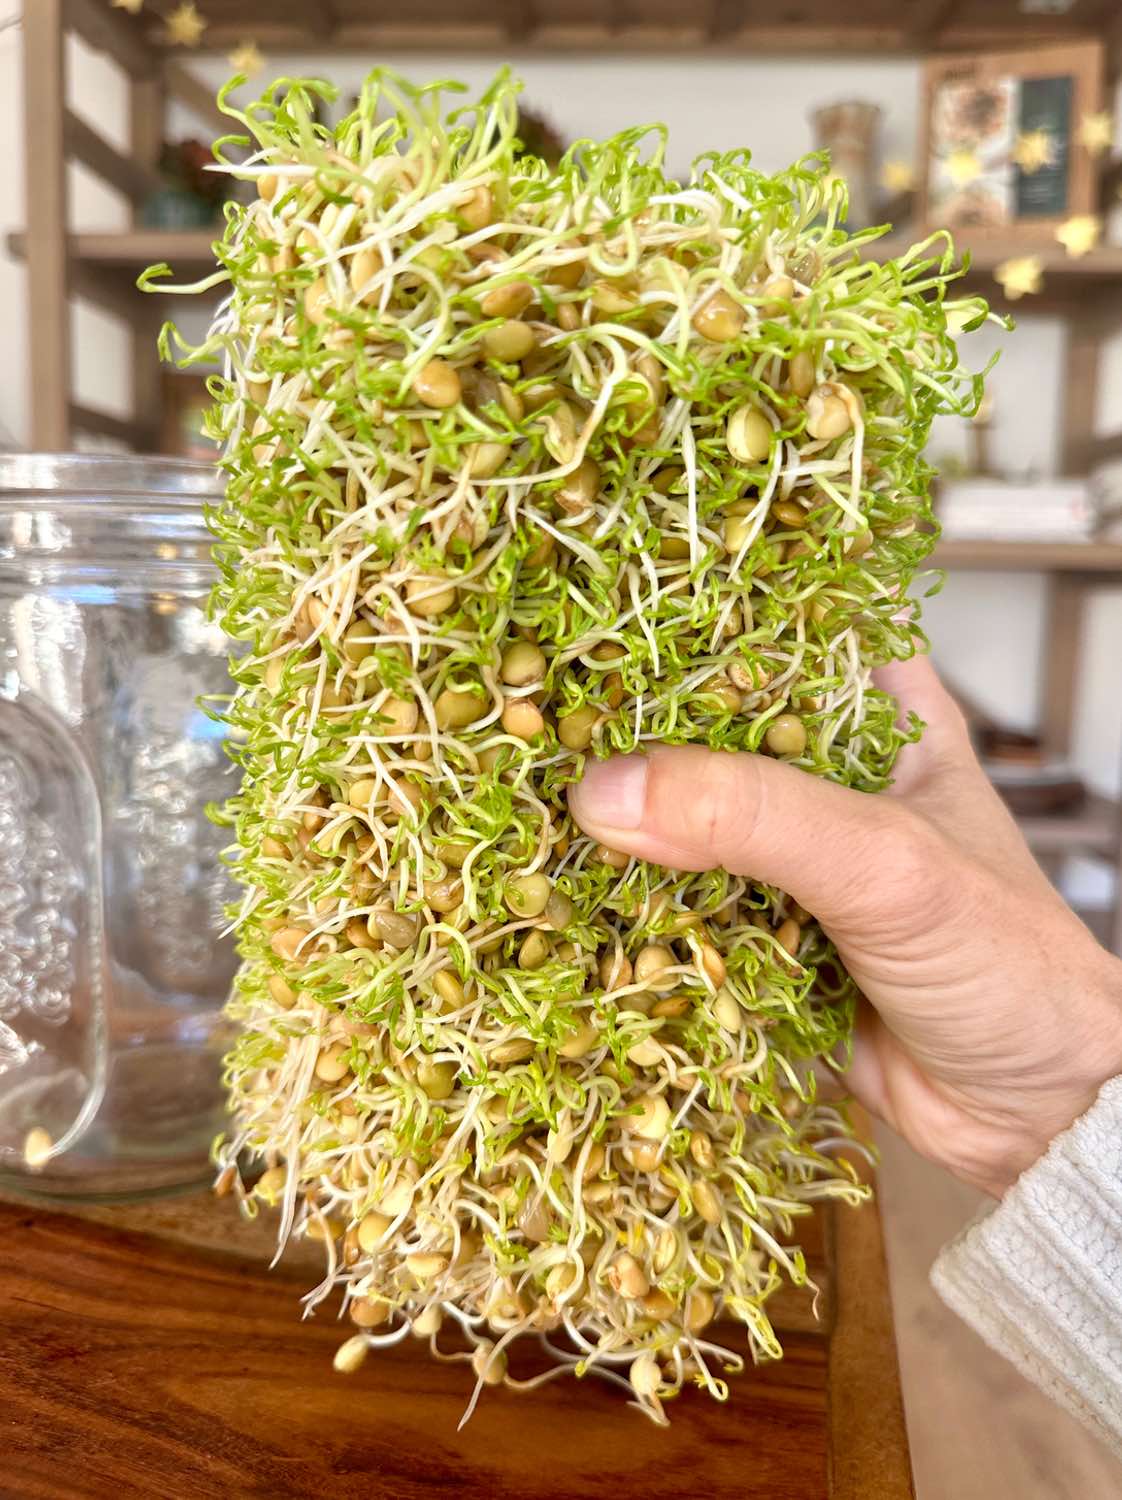
Lentils may be ready when their little tails are relatively short, while broccoli and alfalfa sprouts are commonly grown until they have longer stems and small leaves.
Most common countertop sprouts are ready in approximately 3–7 days.
Once they’ve reached the appropriate stage, give them a final rinse, drain thoroughly, and remove as much excess moisture as possible.
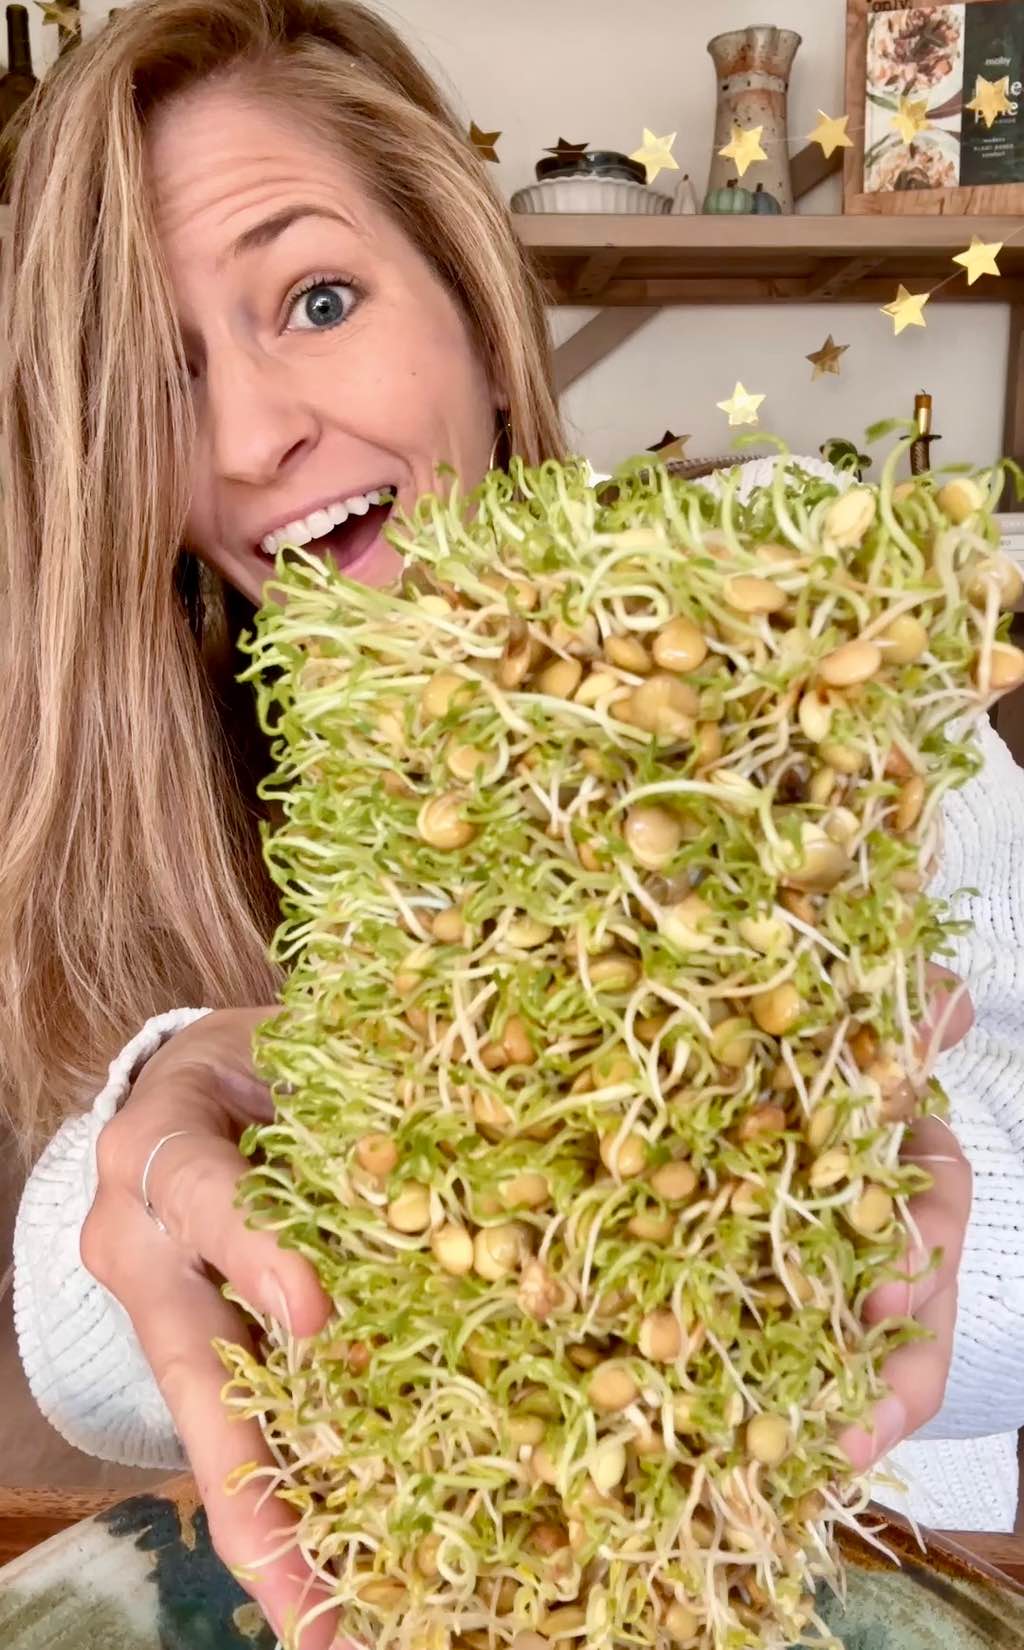
Sprouts are perishable, so refrigerate them promptly rather than continuing to leave them on the counter.
Food safety note: Raw sprouts carry a higher risk of foodborne illness than many other vegetables, including when grown at home. Thorough cooking reduces that risk. See the food-safety section below before deciding how to serve your harvest.
Sprouting Chart: Soaking Times, Growing Days, and Seed Amounts
Different seeds grow at different speeds, and the amount you start with can make a big difference.
This chart is a starting point for common edible sprouting varieties.
| Sprout variety | Soaking time | Approx. days to harvest | Dry seeds for a 1-quart jar* |
|---|---|---|---|
| Broccoli | 6–8 hours | 4–7 days | 1 tbsp |
| Alfalfa | 6–8 hours | 5–7 days | 1 tbsp |
| Clover | 6–8 hours | 5–7 days | 1 tbsp |
| Radish | 4–8 hours | 4–6 days | 1 tbsp |
| Kale | 6–8 hours | 5–7 days | 1 tbsp |
| Green lentils | 8–12 hours | 2–4 days | 2 tbsp |
| Mung beans | 8–12 hours | 3–5 days | 2 tbsp |
| Green peas | 8–12 hours | 2–4 days | 2 tbsp |
| Chickpeas | 8–12 hours | 2–4 days | 2 tbsp |
| Fenugreek | 6–8 hours | 4–6 days | 1 tbsp |
The seed amounts are conservative beginner starting quantities for a 1-quart jar, not maximum capacities or tested yields. Exact soaking and harvest times vary by variety, room conditions, equipment, and seed supplier. Follow your seed package when its instructions differ.
Using The Sprouting Company’s larger sprouter? Their recommended quantities are approximately ¼ cup for small leafy seeds such as broccoli, alfalfa, radish, and salad mixes, and up to 1 cup for certain larger legume varieties in their 55-ounce sprouter. Always check the directions for the specific product.
Tip: Start with less seed than you think you’ll need! Overcrowded jars can make thorough rinsing and draining more difficult.
[GRAPHIC: A clean, printable version of the sprouting chart, designed for saving to Pinterest or hanging on the refrigerator.]
Which Seeds Are Best for Sprouting?
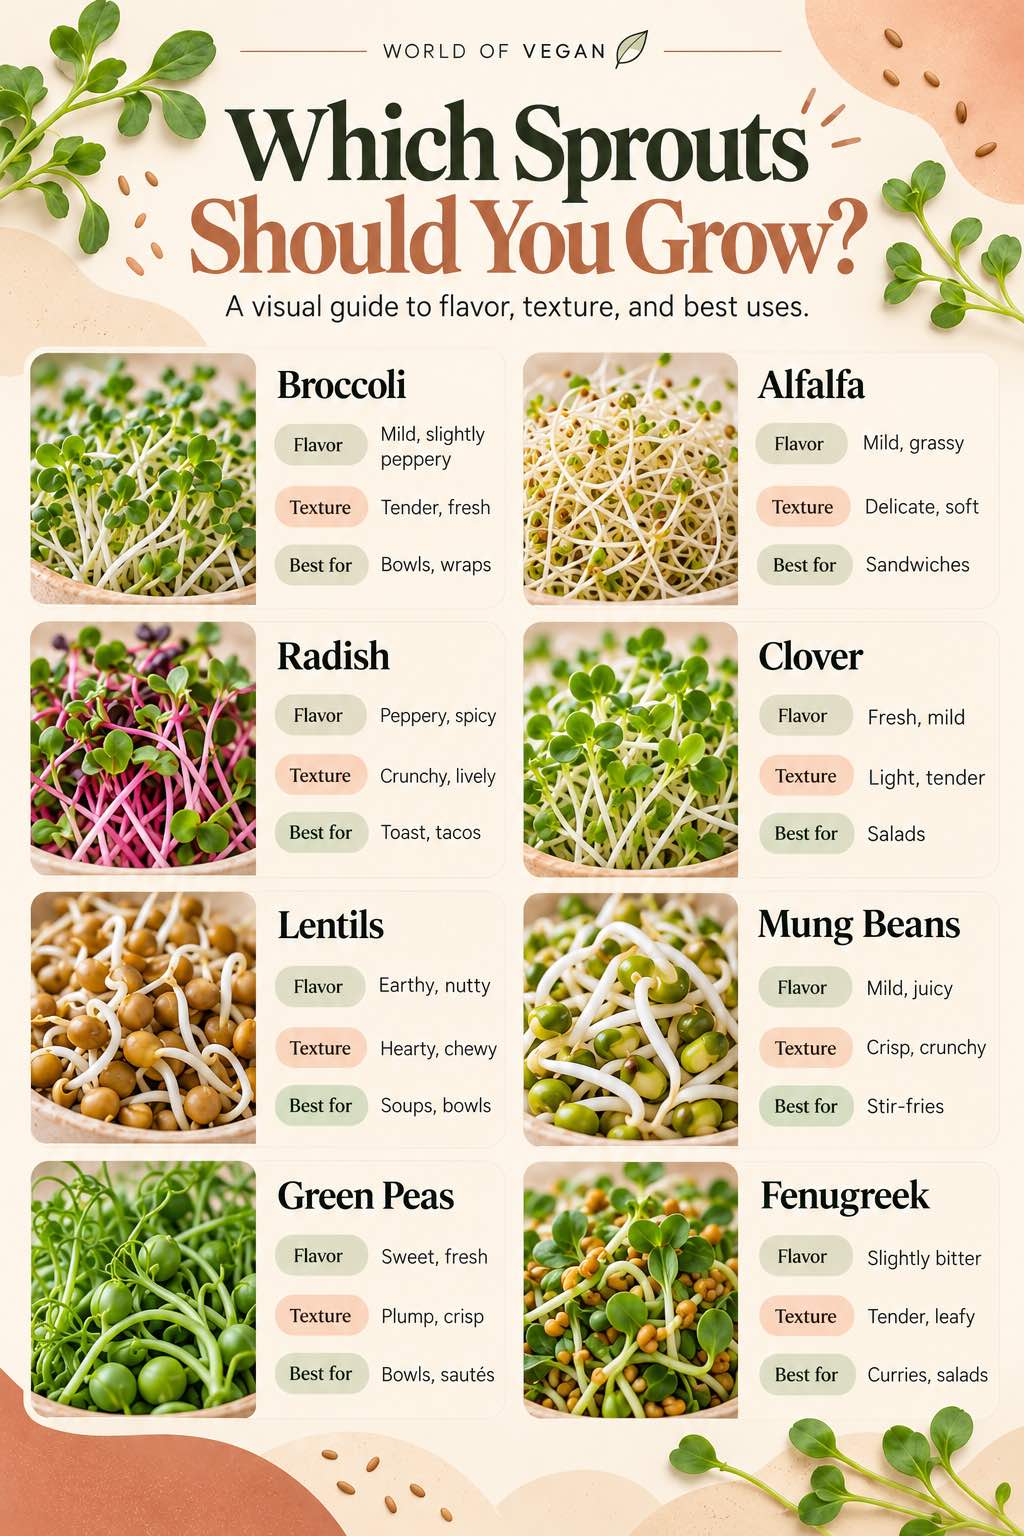
There are lots of edible seeds you can sprout, and each one brings something a little different to the table.
Here’s how to choose your first batch.
Broccoli Sprouts: Mild and Versatile
Broccoli sprouts have slender stems, tiny green leaves, and a fresh, slightly peppery flavor.
They’re especially popular because broccoli and other cruciferous vegetables contain glucosinolates, naturally occurring plant compounds involved in the formation of substances such as sulforaphane.
Sulforaphane has attracted significant scientific attention for its potential antioxidant, anti-inflammatory, and cancer-protective properties. It activates a cellular defense pathway called Nrf2, which helps the body regulate enzymes involved in protecting cells from oxidative stress and processing certain harmful substances.
Here’s what’s especially interesting: research from Johns Hopkins found that certain three-day-old broccoli sprouts contain 10–100 times more glucoraphanin by weight than mature broccoli!
You’ll often see broccoli sprouts discussed in nutrition research, although the amount of these compounds varies depending on the seed variety and growing conditions.
Flavor: Mild, fresh, lightly peppery.
Alfalfa Sprouts: The Classic Sandwich Sprout
Alfalfa sprouts are delicate, tender, and mild. Their fine stems and soft leaves make them a familiar favorite in sandwiches and wraps.
Flavor: Light, grassy, and mild.
Radish Sprouts: A Little Spicy!
If you love a peppery kick, try radish sprouts. They offer a punchier flavor that can brighten up otherwise mild ingredients.
Flavor: Peppery, sharp, and slightly spicy.
Lentil Sprouts: Hearty and Satisfying
Sprouted lentils are quite different from delicate leafy sprouts. They have a hearty texture and earthy flavor, making them especially useful in cooked meals.
Flavor: Earthy, nutty, and mildly sweet.
Mung Bean Sprouts: Crunchy and Crisp
Mung bean sprouts are known for their juicy crunch and are commonly used in many Asian cuisines. They’re a wonderful choice for stir-fries, soups, and noodle dishes.
Flavor: Mild, refreshing, and slightly sweet.
Green Pea Sprouts: Sweet and Fresh
Sprouted peas have a mild, slightly sweet taste and a more substantial bite than many tiny leafy sprouts.
Flavor: Sweet, fresh, and grassy.
Can You Sprout Different Seeds Together?
Yes! Some seeds grow well together, and combining them can create more interesting flavors and textures.
The easiest approach is to choose seeds with similar soaking and growing requirements.
| Sprout combination | Why try it? |
|---|---|
| Broccoli + Alfalfa | Tender greens with a mild, fresh flavor |
| Broccoli + Radish | Mild sprouts with a peppery kick |
| Alfalfa + Clover | Soft, delicate, classic sandwich-style sprouts |
| Broccoli + Alfalfa + Radish | A balanced mix of mild greens and spicy flavor |
| Lentils + Mung Beans | A heartier mix for thoroughly cooked dishes |
These are flavor-based ideas for experimenting, not guaranteed formulas for every seed variety. Start small, follow your supplier’s instructions, and avoid mixing seeds that require significantly different growing methods. If a batch grows unevenly, try separate jars.
How to Tell When Sprouts Are Ready
You don’t need to wait for your sprouts to look like miniature versions of mature vegetables.
In fact, that’s the point of sprouting: you’re harvesting the plant early!
Look for:
- Healthy growth: Most seeds have germinated and developed visible roots or shoots.
- The appropriate size: Delicate leafy sprouts often have longer stems and tiny leaves, while legumes may be harvested at a shorter stage.
- A normal appearance for the variety: Sprouts shouldn’t be slimy, decaying, or visibly moldy.
- The recommended growing time: Use the seed supplier’s instructions as your guide rather than relying on appearance alone.
A larger jar of broccoli sprouts may look surprisingly full by harvest day. That’s completely normal!
How to Store Homegrown Sprouts
Fresh sprouts are delicate and highly perishable, so proper storage matters.
After harvesting:
- Rinse and drain thoroughly using clean equipment.
- Remove as much excess water as possible.
- Transfer to a clean, food-safe container.
- Refrigerate promptly at 40°F (4°C) or below.
- Use within a few days, ideally 3–4 days for best quality, and discard sooner if they deteriorate.
Avoid packing away sprouts while they’re dripping wet. Excess moisture can contribute to spoilage.
Keep sprouts refrigerated until you’re ready to prepare them, and remember that refrigeration slows bacterial growth but doesn’t make contaminated sprouts safe.
Common Sprouting Problems (And How to Fix Them)
Most beginner sprouting problems come down to seed quality, temperature, crowding, or drainage.
| Problem | Possible cause | What to do |
|---|---|---|
| Seeds aren’t sprouting | Old seeds, unsuitable seeds, or unfavorable temperature | Start again with fresh edible sprouting seeds and follow the package instructions |
| Sprouts are growing slowly | Cool temperatures or variety differences | Check the expected growing time and maintain a moderate room temperature |
| Water collects at the bottom | Jar isn’t draining completely | Adjust the angle and drain thoroughly after every rinse |
| Sprouts are packed tightly | Too many seeds in the jar | Use fewer seeds in the next batch |
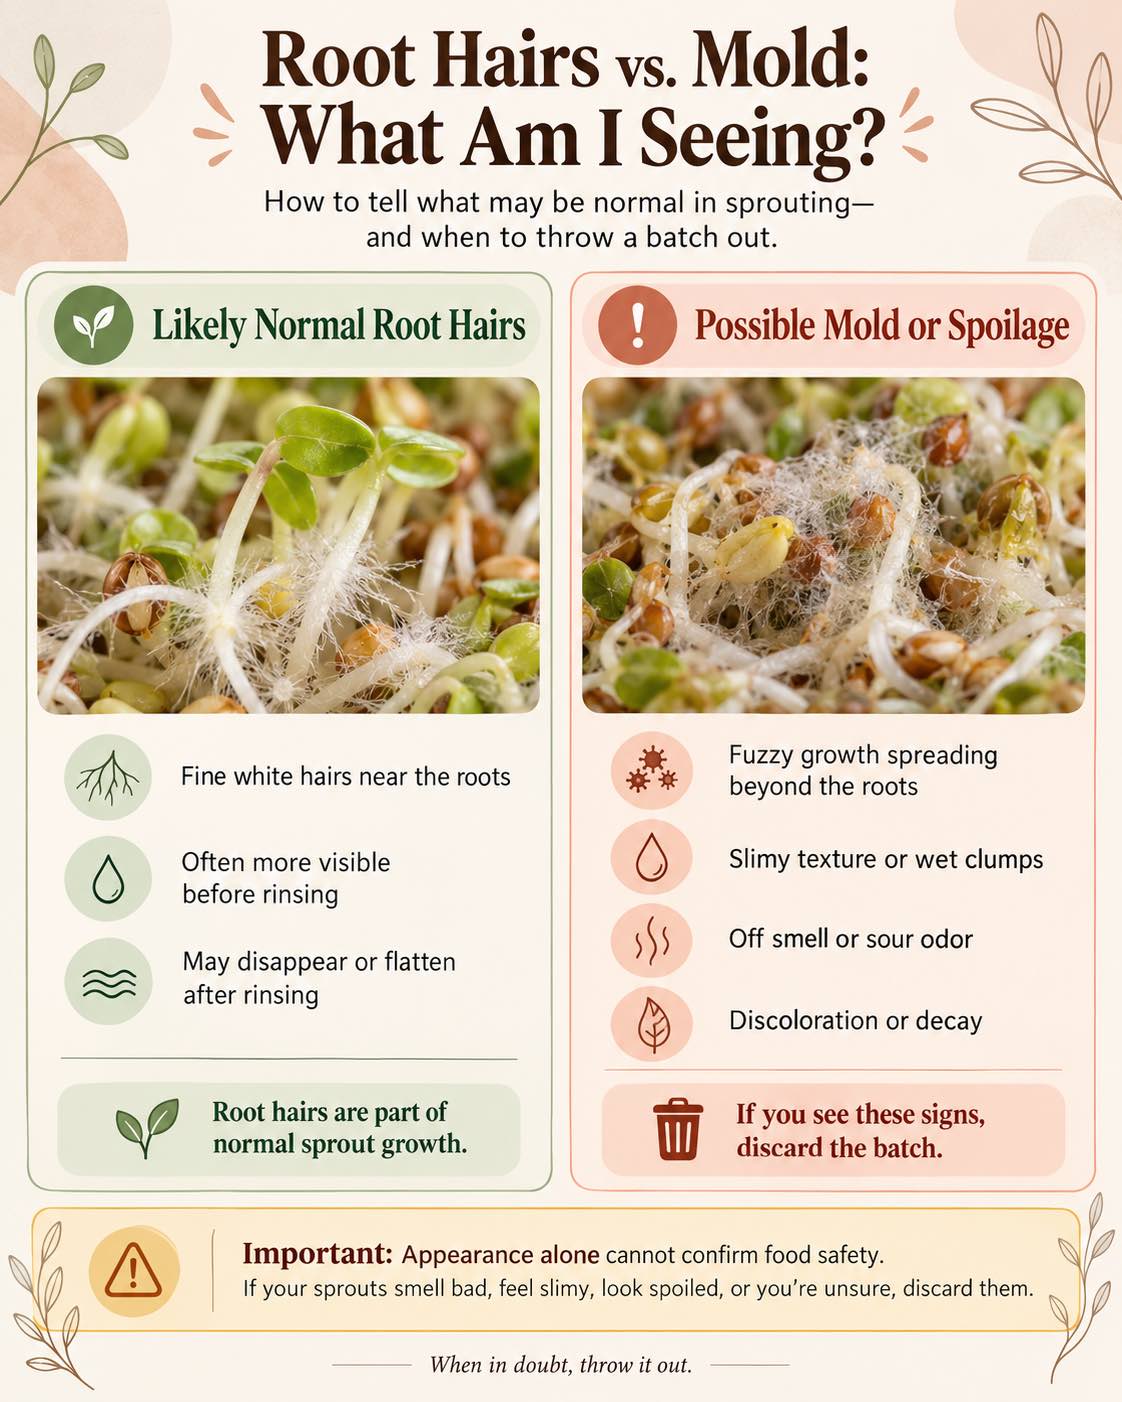
| Tiny white hairs appear near the roots | They may be normal root hairs | Compare with the variety’s normal appearance; discard if you’re uncertain |
| Sprouts smell rotten or feel slimy | Possible spoilage | Discard the entire batch and clean and sanitize the equipment |
| Visible mold develops | Possible contamination | Discard the batch; don’t try to salvage it |
Are Those White Hairs on My Sprouts Mold?
Not necessarily!
Some sprouts develop fine, white root hairs, especially around the main root. These are a normal part of plant growth and may be particularly noticeable between rinses.
However, mold can also appear fuzzy, so appearance alone isn’t a reliable food-safety test.
If you notice suspicious spreading growth, discoloration, unpleasant odors, sliminess, or anything that makes you question the batch, discard it.
Don’t taste questionable sprouts to find out if they’re okay.
Important Food Safety Tips for Growing Sprouts
Growing sprouts is easy, but sprouts deserve special attention when it comes to food safety.
The warm, moist conditions that help seeds germinate can also allow harmful bacteria, including Salmonella and certain strains of E. coli, to multiply.
Contamination can originate on the seeds themselves, which means even homegrown sprouts raised in a clean jar can carry foodborne-illness risks.
To reduce your risk:
- Purchase seeds specifically intended for edible sprouting from a reputable supplier with documented food-safety practices.
- Check for seed recalls before starting a new batch.
- Wash your hands and clean and sanitize equipment between batches.
- Use clean, potable water for soaking and rinsing.
- Follow the recommended growing process, paying particular attention to drainage.
- Discard any batch that becomes slimy, moldy, discolored, or unusually odorous.
- Refrigerate harvested sprouts promptly.
- Cook sprouts thoroughly to reduce the risk of foodborne illness.
Children, pregnant people, older adults, and people with weakened immune systems should avoid eating raw or lightly cooked sprouts.
The FDA also cautions that rinsing raw sprouts cannot reliably remove harmful bacteria. Good growing practices can reduce opportunities for contamination, but they cannot guarantee safety.
For additional information, review the FDA’s guidance on selecting and serving produce safely.
Delicious Ways to Use Homegrown Sprouts
One of the best things about growing your own sprouts is having fresh ingredients ready to add to your everyday meals.
Here are a few ways to put your harvest to good use.
Stir Them Into Noodle Dishes
Mung bean sprouts are especially good in stir-fries and noodle dishes. Add them during cooking so they retain some of their texture while heating thoroughly.
Add Them to Wraps and Sandwiches
Tender sprouts are a classic sandwich ingredient. For a lower-risk option, use fully cooked sprouts in warm wraps, pressed sandwiches, or other heated fillings.
Looking for inspiration? Try our colorful rainbow veggie wraps.
Make Sprouted Lentil Soup
Sprouted lentils can be cooked in hearty soups and stews with vegetables, herbs, and spices.
They’re a fun way to experiment with an ingredient you may already have in your pantry.
Add Them to Cooked Grain Bowls
Try cooked broccoli, radish, or lentil sprouts with rice, quinoa, roasted vegetables, and a flavorful sauce.
A spoonful of our creamy vegan oil-free salad dressing can tie everything together.
Try Them in Hummus Dishes
Cooked sprouts can also add texture and variety to savory hummus dishes.
Our hummus crostini is a colorful starting point for experimenting with vegetable toppings.

Frequently Asked Questions About Sprouting
Most common sprouts are ready in approximately 3–7 days, depending on the seed variety and growing conditions. Some legumes can develop short sprouts in just a couple of days, while delicate leafy varieties may take closer to a week.
No, seeds don’t need sunlight to begin germinating. Sprouts can grow indoors without special grow lights. Avoid direct hot sunlight, which can overheat the jar.
Yes! A wide-mouth mason jar with a suitable sprouting lid can work well. The important part is being able to rinse the seeds easily and drain the water completely.
It’s better to buy seeds specifically intended for edible sprouting. Ordinary dried beans or garden seeds may not have been handled, stored, or tested appropriately for sprouting.
Not using the usual rinse-and-drain method. Chia and flax become gelatinous when wet and are better suited to specialized growing methods, such as appropriate trays or mats.
Kidney beans aren’t a good choice for this type of home sprouting guide. Raw or undercooked kidney beans contain potentially harmful lectins and require proper cooking. Sprouting alone doesn’t make them safe to eat.
For many common sprouting varieties, twice a day—morning and evening—is a typical routine. Follow your seed supplier’s instructions, and make sure the jar drains thoroughly after every rinse.
For best quality, plan to use them within a few days of harvesting. Keep them refrigerated at 40°F (4°C) or below, and discard any sprouts that show signs of spoilage. Storage time is not a guarantee of safety if contamination is present.
No. Sprouts are germinated seeds usually grown without soil and harvested with their roots and seeds attached. Microgreens grow longer, typically in a growing medium, and are harvested by cutting the stems.
Ready to Grow Your First Batch?
You don’t need a garden—or even a green thumb—to enjoy the experience of growing your own food.
Start with a single variety, get comfortable with the soaking and rinsing routine, and experiment with different flavors as you go.
If you’d like a dedicated setup, The Sprouting Company offers a countertop sprouter and a variety of organic sprouting seeds to help you get started.
And once you discover how satisfying it is to watch a few spoonfuls of seeds turn into a full jar of sprouts, you may find yourself making room for a second jar!
Happy sprouting!
You may also like...



Enter to Win Our Monthly Giveaway!
New winner every month! Drop your name below for a chance to win hundreds of dollars of vegan prizes from our brand partners. You’ll also receive our weekly e-newsletter with plant-based recipes galore!