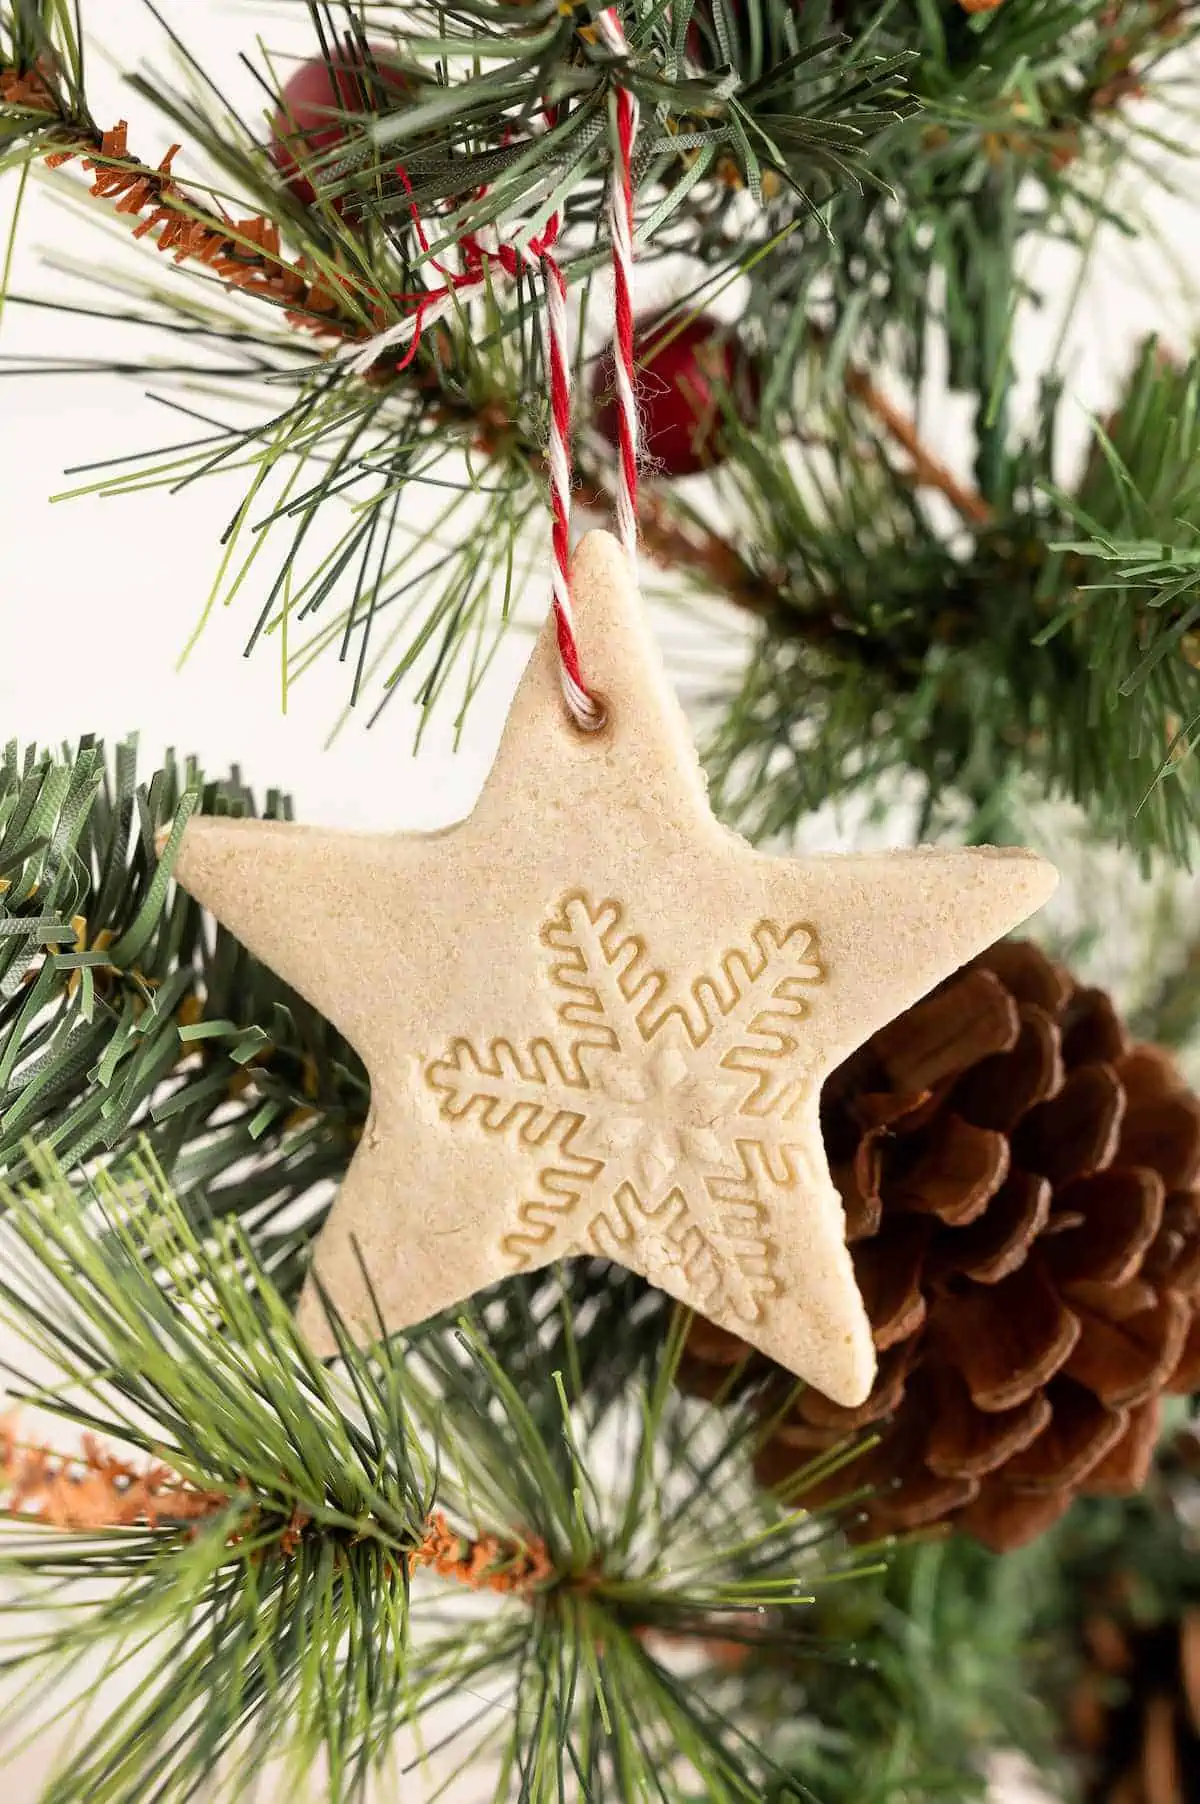
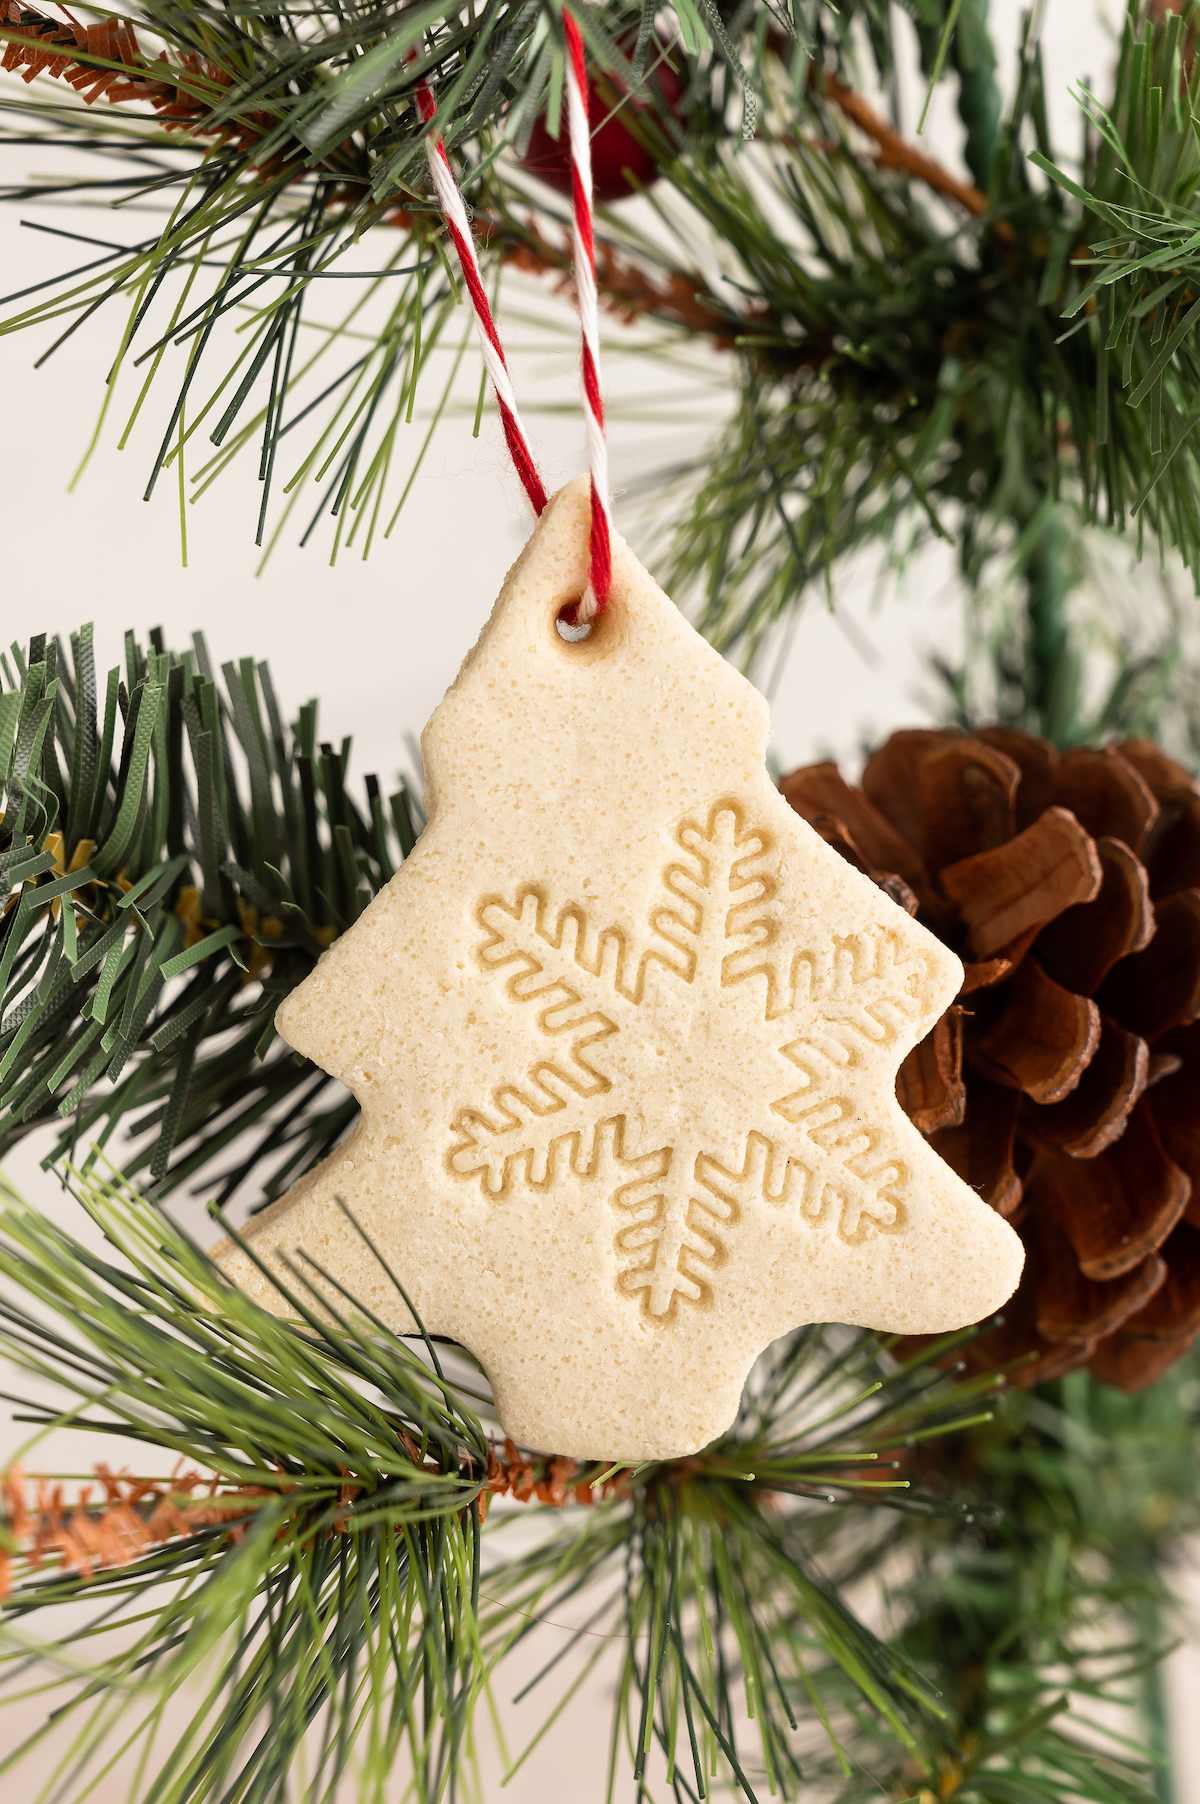
Salt Dough Ornaments
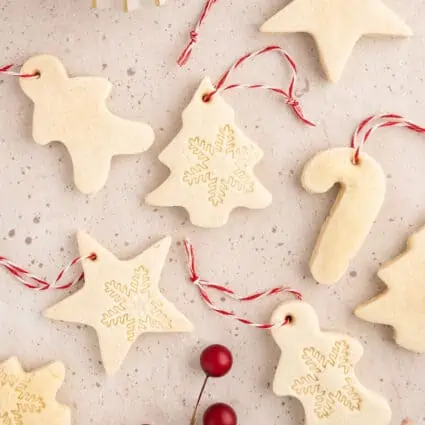
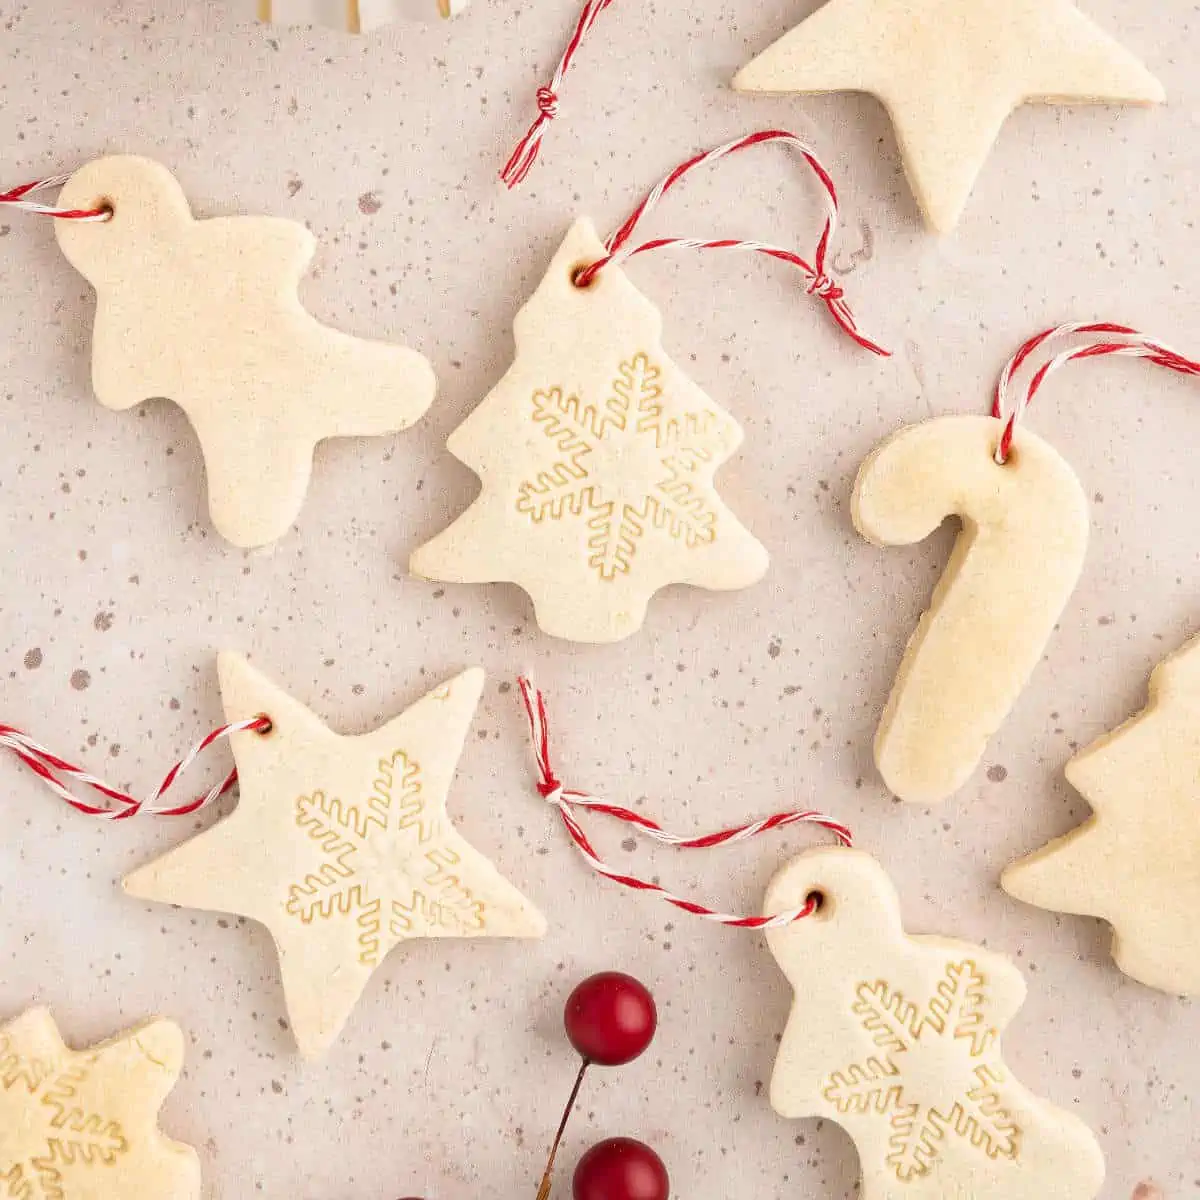
With only three simple pantry ingredients, you and your family can create salt dough ornaments for any season or special occasion. Measuring out ingredients, forming the dough, and incorporating tactile elements is fun for any age, but especially for younger ones. This soothing activity brings together science, cooking, and artful creativity––what could be better?
When the holidays roll around, the first thing that comes to mind is decorating…or maybe food. Either way, both food and decorations can transform a festive event into something even more magical and memorable. (Although this DIY clay recipe is technically edible, we don’t recommend giving it a try. The amount of salt would be overwhelming!)
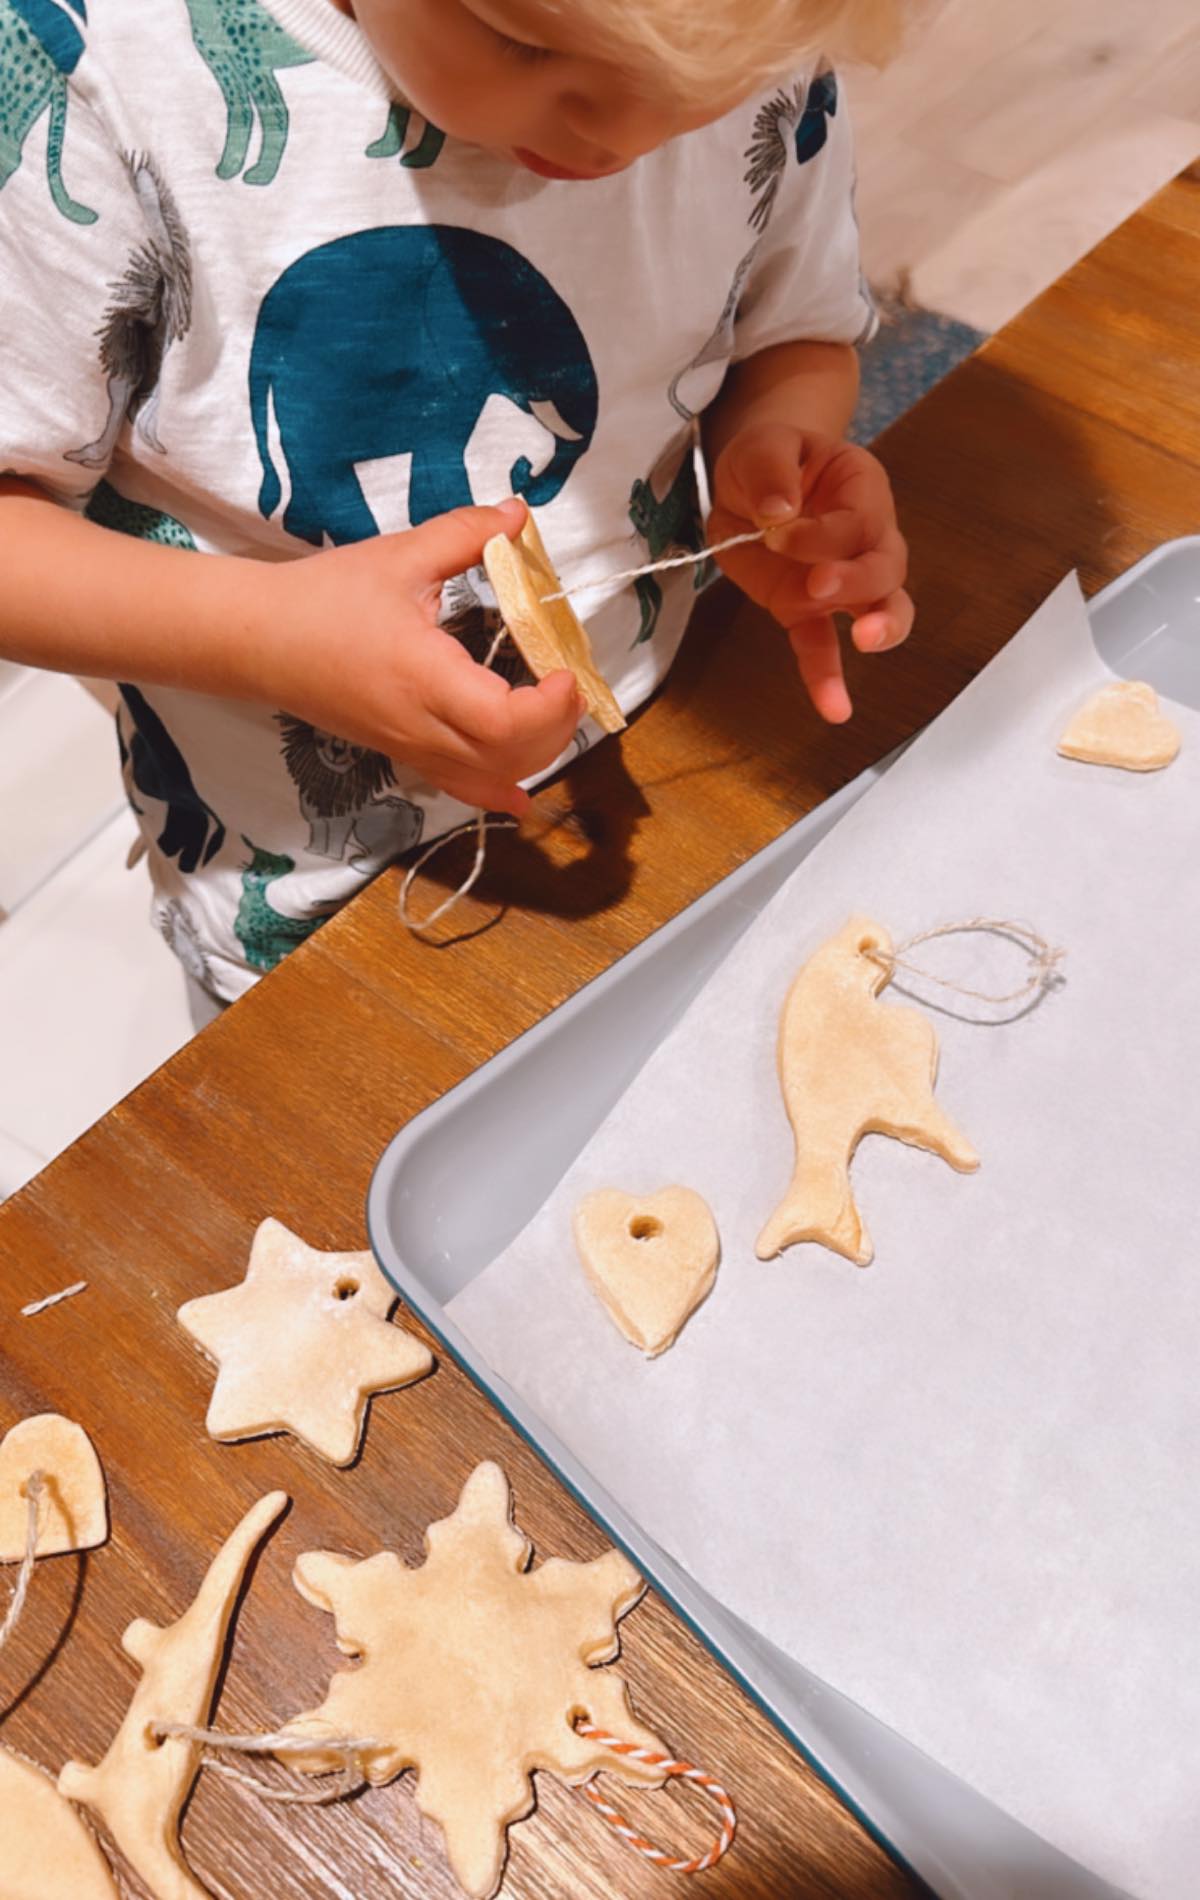
If you have kiddies at home who become bored easily (or if the weather is wonky), use this opportunity to create an at-home Art Camp for Kids! This is the perfect time for children (or adults!) to allow their creativity to flow freely. Spend the day mixing up the salt dough (a super sensory activity opportunity) and decorating with delight after the ornaments are done.
Let’s get started!
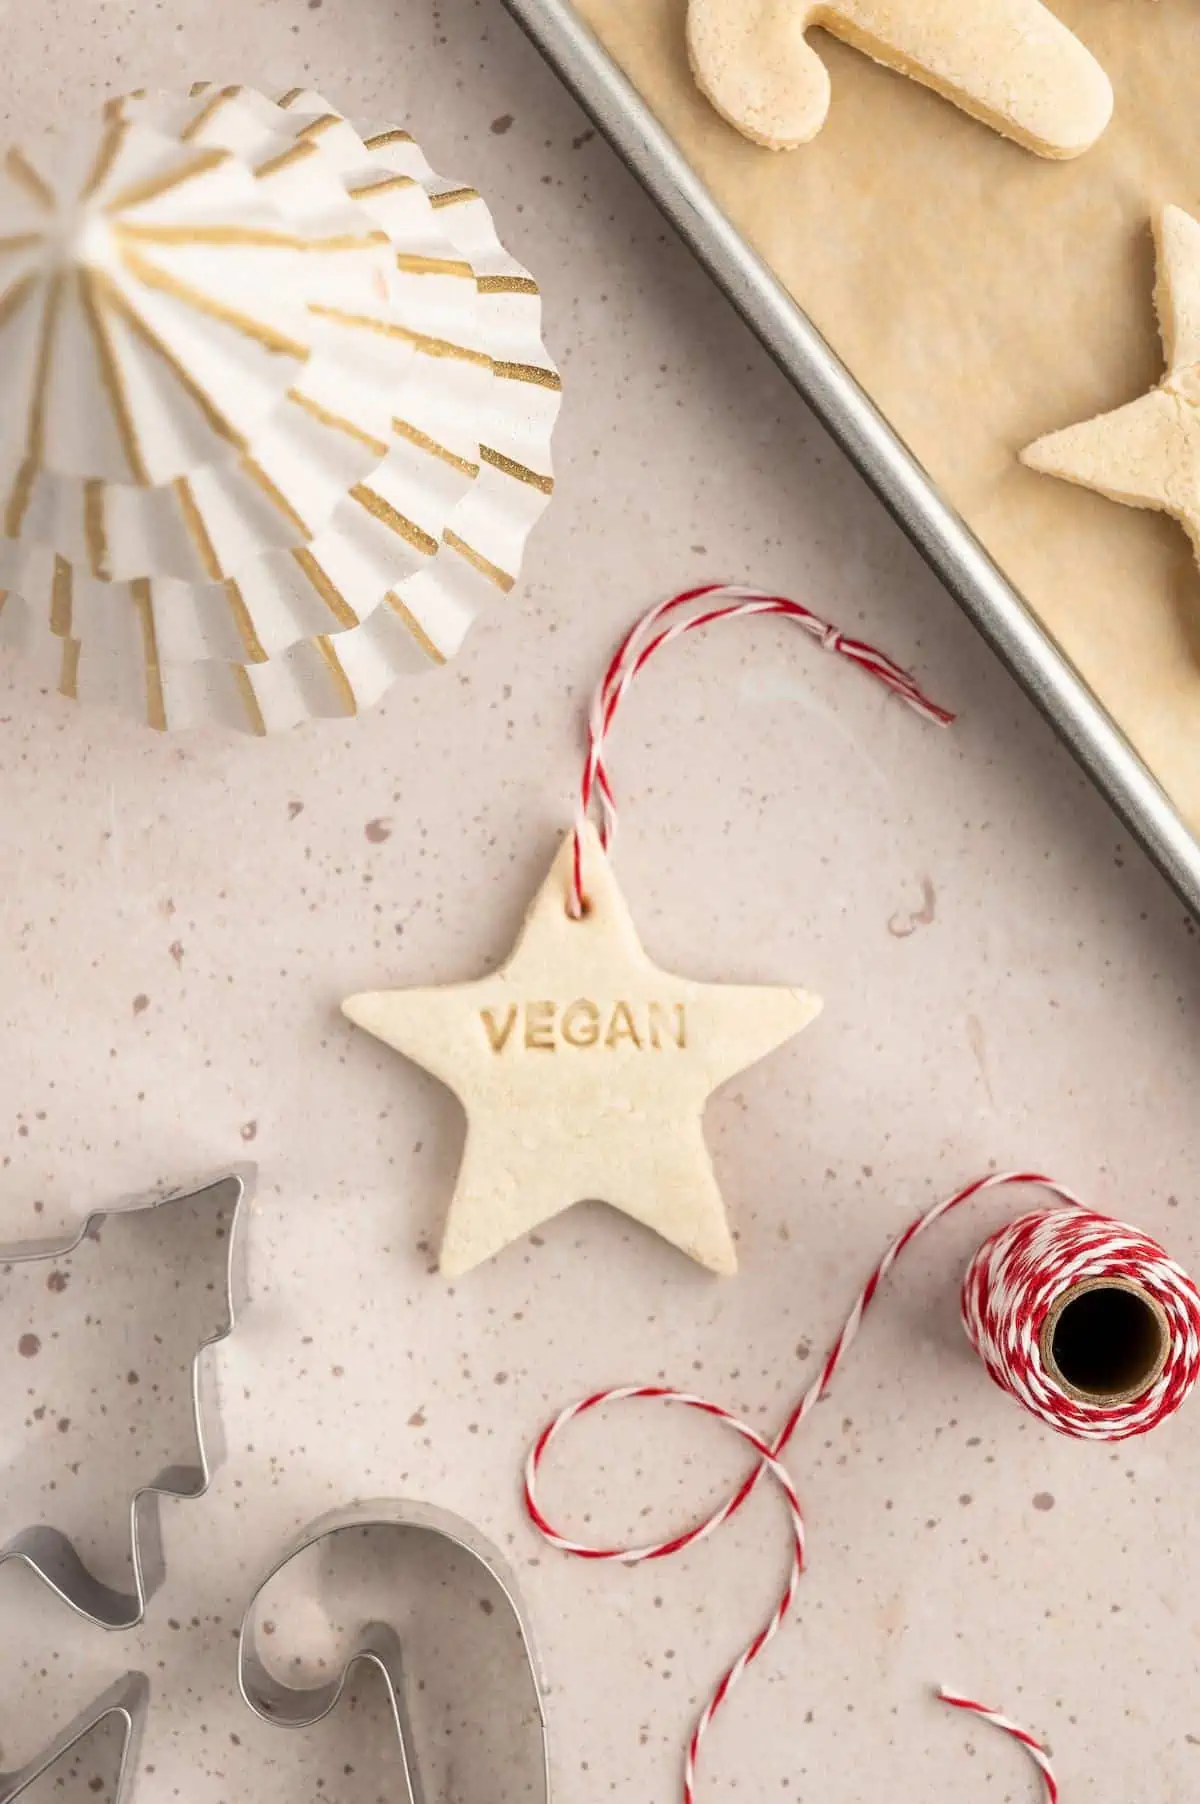
Table of Contents
DIY Clay Tips
Creating your own homemade clay is easier than you think! Although this project may get a little messy, it’s totally worth it. These salt dough ornaments can be exquisite and elegant or super chill and cheezy. They can be cute and cuddly, classic or contemporary, and even silly or scary. There are no rules once the dough is ready.
Before you get started, here are few suggestions to keep the clutter in check:
- Cover Your Space – Find an area in your home (possibly the kitchen) where you can add easy-to-clean cloths or newspaper to spread over your working surface. It might be a good idea to cover your clothing, as well. A kitchen apron or old clothes would work well.
- Collect Creative Tools – Fill small cardboard boxes or plastic containers with a variety of art supplies such as paints, paintbrushes, crayons, markers, small items (rocks, seashells, bells, etc.), glue, and hanging materials (twine, ribbon, lace, etc.). This will make organization less chaotic and can help to keep things contained.
- Cleaning Supplies – Even the neatest person will appreciate having some wet cloths, reusable paper towels, wipes, or perhaps a little brush and dust pan to minimize the mess. Washing hands before and after this project is a must. Especially before adding decorations to your lovely salt dough ornaments.
Holiday Ornament Shape Suggestions
This homemade clay recipe isn’t only for the winter holidays. There are endless ways in which you can personalize this dough to make ornaments of any shape, size, or color. Here is a small list of shape suggestions for every season or celebration. We’d love to hear your ideas, too! Make sure to add them to the comments below.
- Celebrate the Seasons – Be inspired by the myriad of colors in each season. For Fall, make leaf shapes in red, yellow, brown, and orange. In Spring, cut out and paint flowers, umbrellas and birds in soft, pastel shades. The Summer months can be swimsuits, sunshine, and flip flops in the brightest jewel tones. Finally, Winter symbols of snowflakes, snowmen, and candles in soft blues, yellow, and white.
- Best Birthday Ever – Pick out shapes that match the person whose birthday it is. Think about their favorite hobbies, colors, and foods when creating their ornaments. They can be given as mini paperweight gifts, hung together in a row as a bunting in their favorite place, or ask friends and family to write a little loving note on the back in paint or marker as a birthday token.
- Make Festive Days Extra Fancy – These adorable ornaments can be made for any yearly holiday. For instance: Valentine’s Day (hearts, cupids, lips), Easter (bunnies, baskets, birds), New Year’s (champagne bottle, horns, year numbers), Halloween (pumpkins, witches, candy), Thanksgiving (corn, friends, pie), or even the First Day of School (pencils, letters, school bus). The ideas are endless!
How To Decorate Your Salt Dough Ornaments
This is the most thrilling part! Use your brain power to come up with your best and most brilliant ideas. You can do it! These are only some suggestions for decorating. The ideas are infinite!
To double check whether the art supplies you’re using are vegan-friendly, make sure to consult our Vegan Art Supply Guide!
- Glitter (or, better yet, Eco Glitter!)
- Acrylic Paint
- Dried Flowers or Herbs (lavender buds, bay leaves, dried flowers, cloves, etc.)
- Sprinkles
- Markers
- Edible Spray Paint
- Add a Printed Photo
- Lace, Yarn or Ribbons
- Sea Glass
- Googly Eyes
- Beads
- Stamps or stencils
- Embossing letters
- Little Bells
- Natural Items (small needles, leaves, sticks, etc.)
Helpful Hint: If you wish for your salt dough ornaments to last more than a year, consider spraying them with a clear acrylic sealer or painting on a layer or two of Mod Podge. Remember to let dry thoroughly before storing.

Scented Salt Dough Ornaments
Why not add a little something special to your ornament before baking? Include several drops (or sprinkles) of a natural scent to the unbaked dough to boost these salt dough decorations up a notch. Here a few scent recipes to get you started:
- Lavender & Rosemary – 9 drops of lavender essential oil + 6 drops of rosemary essential oil or extract. Wonderfully herbal!
- Orange & Cinnamon – 15 drops of orange essential oil (or extract) + ½-1 teaspoon of ground cinnamon. This will give your ornament a delicious, spicy scent, as well as a warm, light brown shade.
- Peppermint & Vanilla – 5 drops of peppermint + 10 drops of vanilla essential oil or extract. Sweet and cool, just like a candy cane!
Note: Make sure to mix in the scented oils, extracts, or spices well into the dough before cutting and baking. If the scent is not strong enough when done, you can always use a paintbrush to brush more onto the back of the salt dough ornament (in case of staining) and let dry.
Four Tips For Hanging Up Your Salt Dough Ornaments
Hanging an ornament (for any occasion) should be fun, not frustrating and fiddly. If you follow these tips, you’ll find yourself looking forward to this step every year. No need to worry!
Use Strong, Reliable Materials
Skimping on the string or using ratty, old ribbon won’t do, friends! If it looks worn out or is breaking apart, put it in the compost or leave out for the birds. Go for good stuff such as: kitchen cotton string, hemp twine, linen cord, satin ribbon, metal ornament hooks (not the flimsy kind), or even rubber bands.
Be Careful About the Hole Placement
When adding the hole to the unbaked ornament, make sure that the hole is not too close to the top. If it is, chances are that the hole may either close up or not be sturdy enough to hold the ornament’s weight once out of the oven. Place the hole at least ¼-½ inch down from the tippy top.
Hang To Your Heart’s Content
Choose between a tree (either natural, artificial or even a small, metal tabletop tree just for ornaments), a wooden, expandable hat rack, or simply anywhere in your home that can hold a little bit of weight. Other unique ideas include door knobs, chair arms, banana trees, chandeliers, mug rack, or even your rear view car mirror! Find that special place and make it a tradition to add it there every year.
Bring Out The Bunting
Instead of arranging the ornaments individually on a tree, hook, or stand, you can tie or sew them onto a sturdy cord (like a cotton clothesline) or to a long length of seam binding (you can find it at any fabric store). Then, simply attach each end securely to the edges of a doorway, across a fireplace mantle or over a window curtain rod. Bunting makes everything more exciting!
Handprint Clay Creations
Make your own homemade clay handprint at home! Swap out cookie cutters for fingers, hands, or paws! These can be such wonderful and thoughtful gifts for family members and friends, as well as to commemorate significant life events and occasions.
- New Baby
- Pets
- First Day of School
- Anniversaries
- Birthdays
To create these lovely, personalized clay pieces, make the salt dough as usual. But, instead of cutting out small, individual shapes, roll out the dough into one large shape. Place on a sheet of parchment paper. Try to keep the dough to around ½” thickness. Clean and dry the selected hand, finger, thumb, or paw (or item) well. Press the chosen part into the dough so that there’s a definite depression, but not all the way to the bottom. Remove very gently.
Lift the parchment paper off of the counter and place onto a baking sheet. Bake as for the salt dough ornaments. You may choose not to flip the piece over in the middle of baking. If you feel nervous that your creation might crack or break, simply turn the baking sheet around 180 degrees and continue baking. It’s not completely necessary for it to be flipped onto the other side. When done, let cool as directed and decorate!
Step-By-Step Tutorial
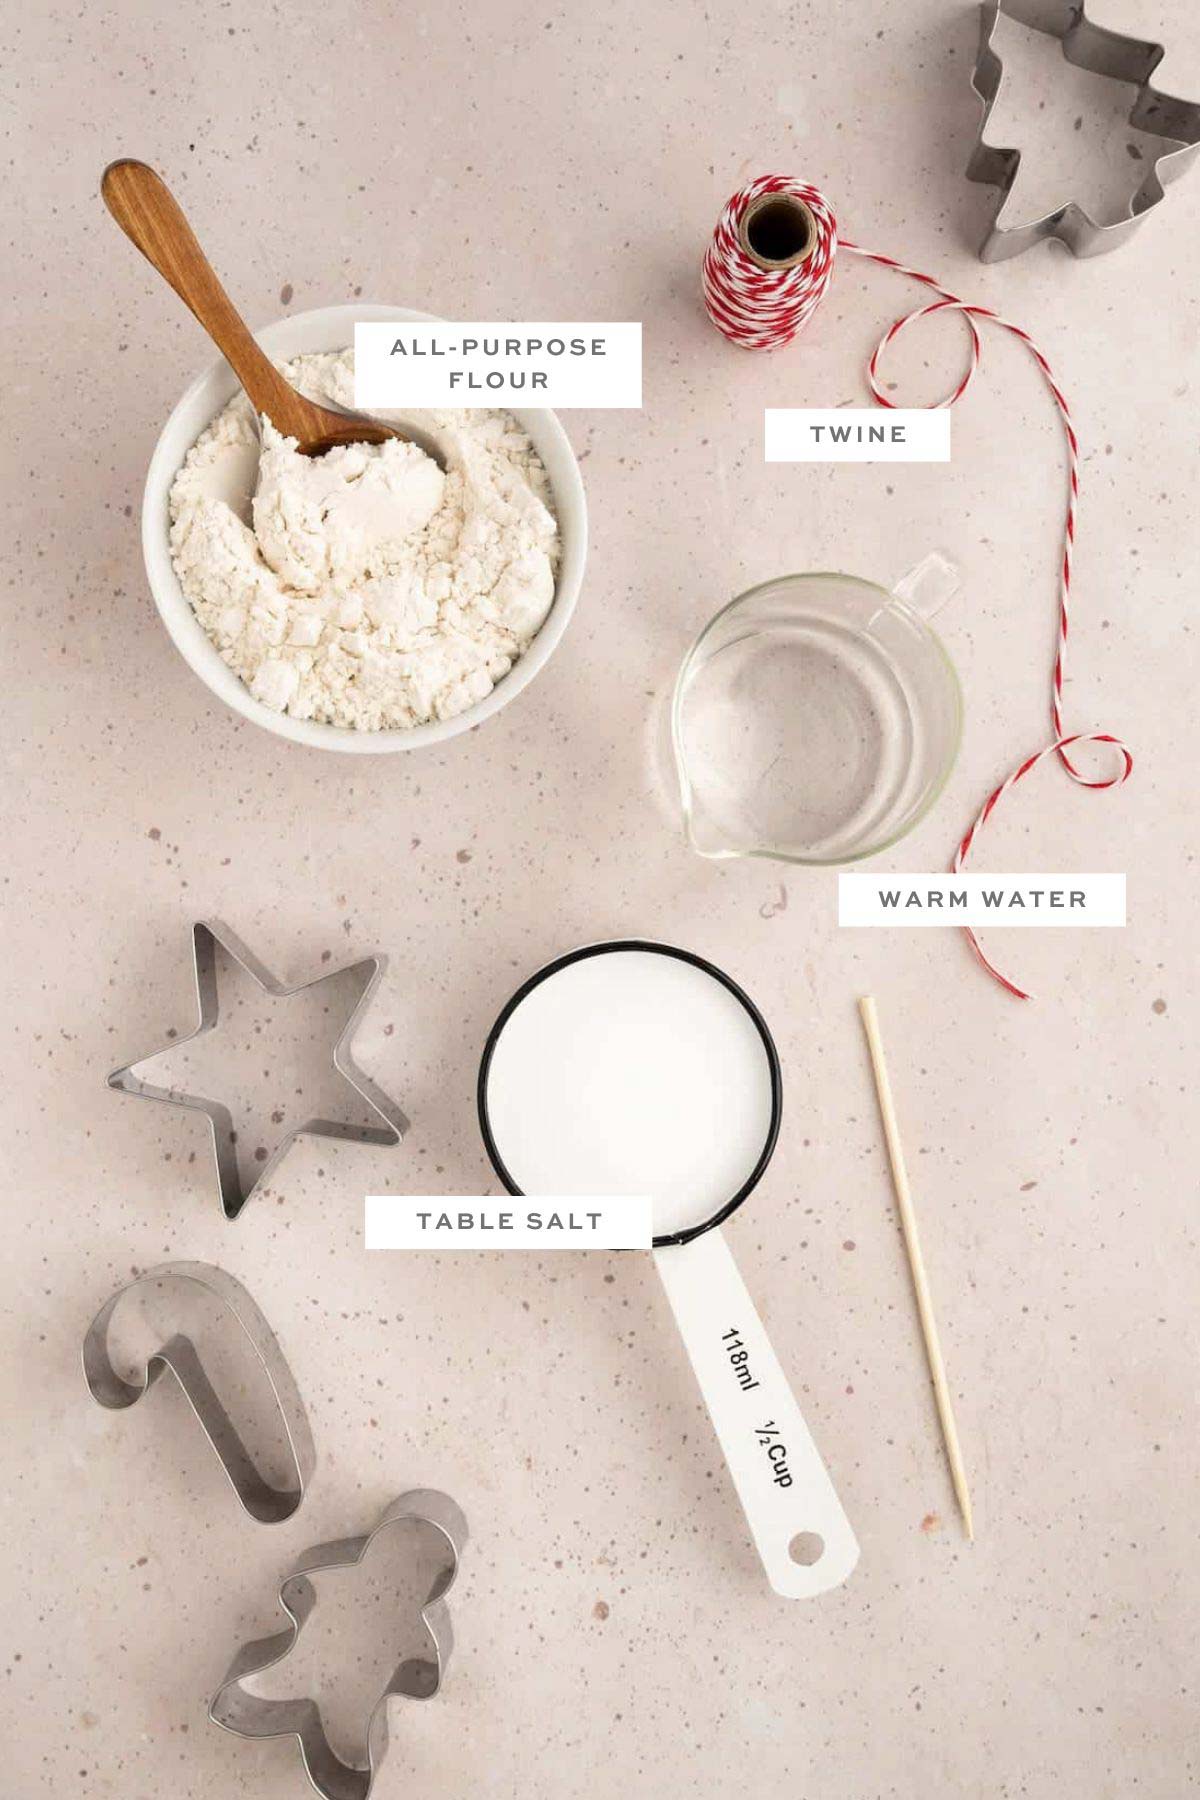
To make these easy homemade clay ornaments all you need are three simple ingredients: all-purpose flour, salt, and water! That’s it!
Step 1:
Preheat the oven to 200 degrees F or the lowest temperature your oven will go to.
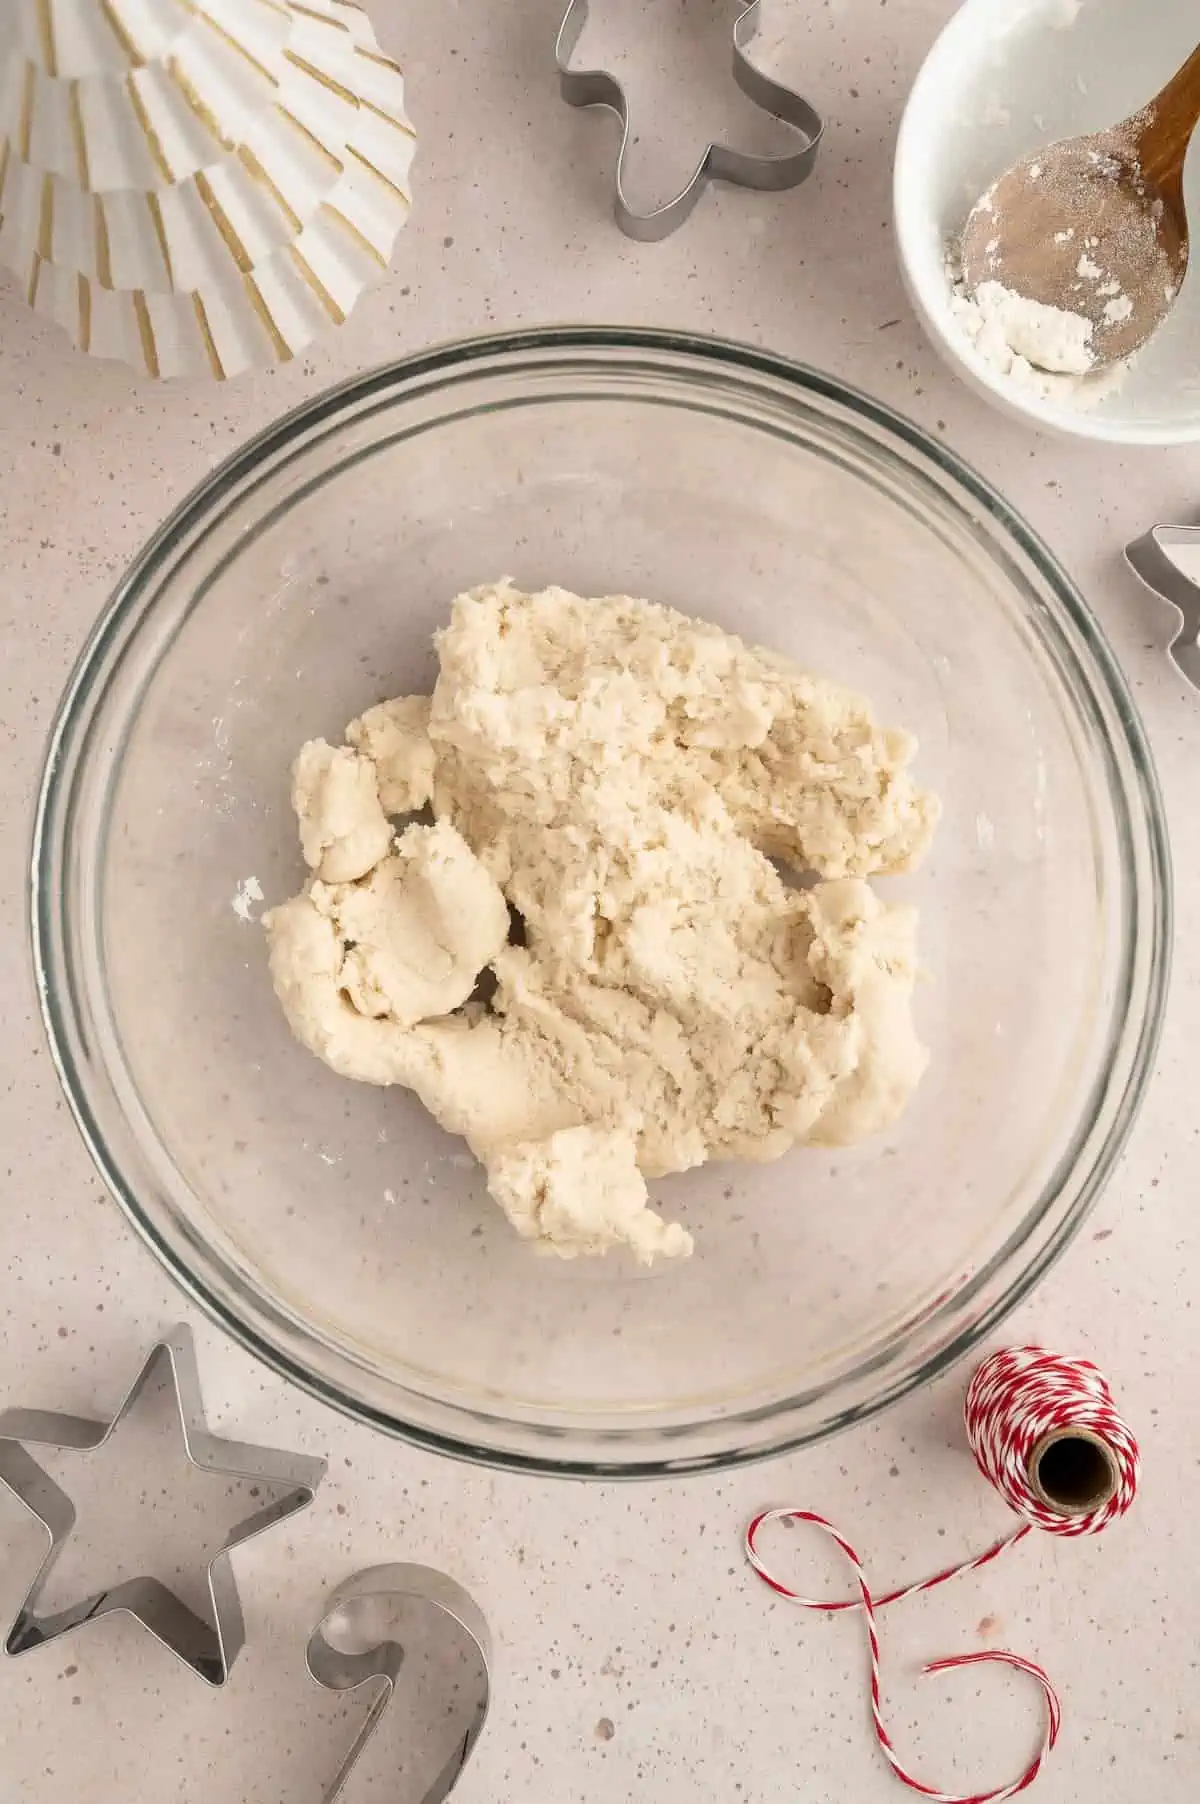
In a medium to large mixing bowl, add the flour, salt, and water and mix thoroughly using a wooden spoon or your hands. Once a dough forms, keep kneading it for a few minutes, adding a sprinkle of flour as needed if the dough becomes too sticky.
Step 2:
Once the dough has a soft, mostly dry texture, allow it to rest in the bowl for 20-30 minutes.
Step 3:
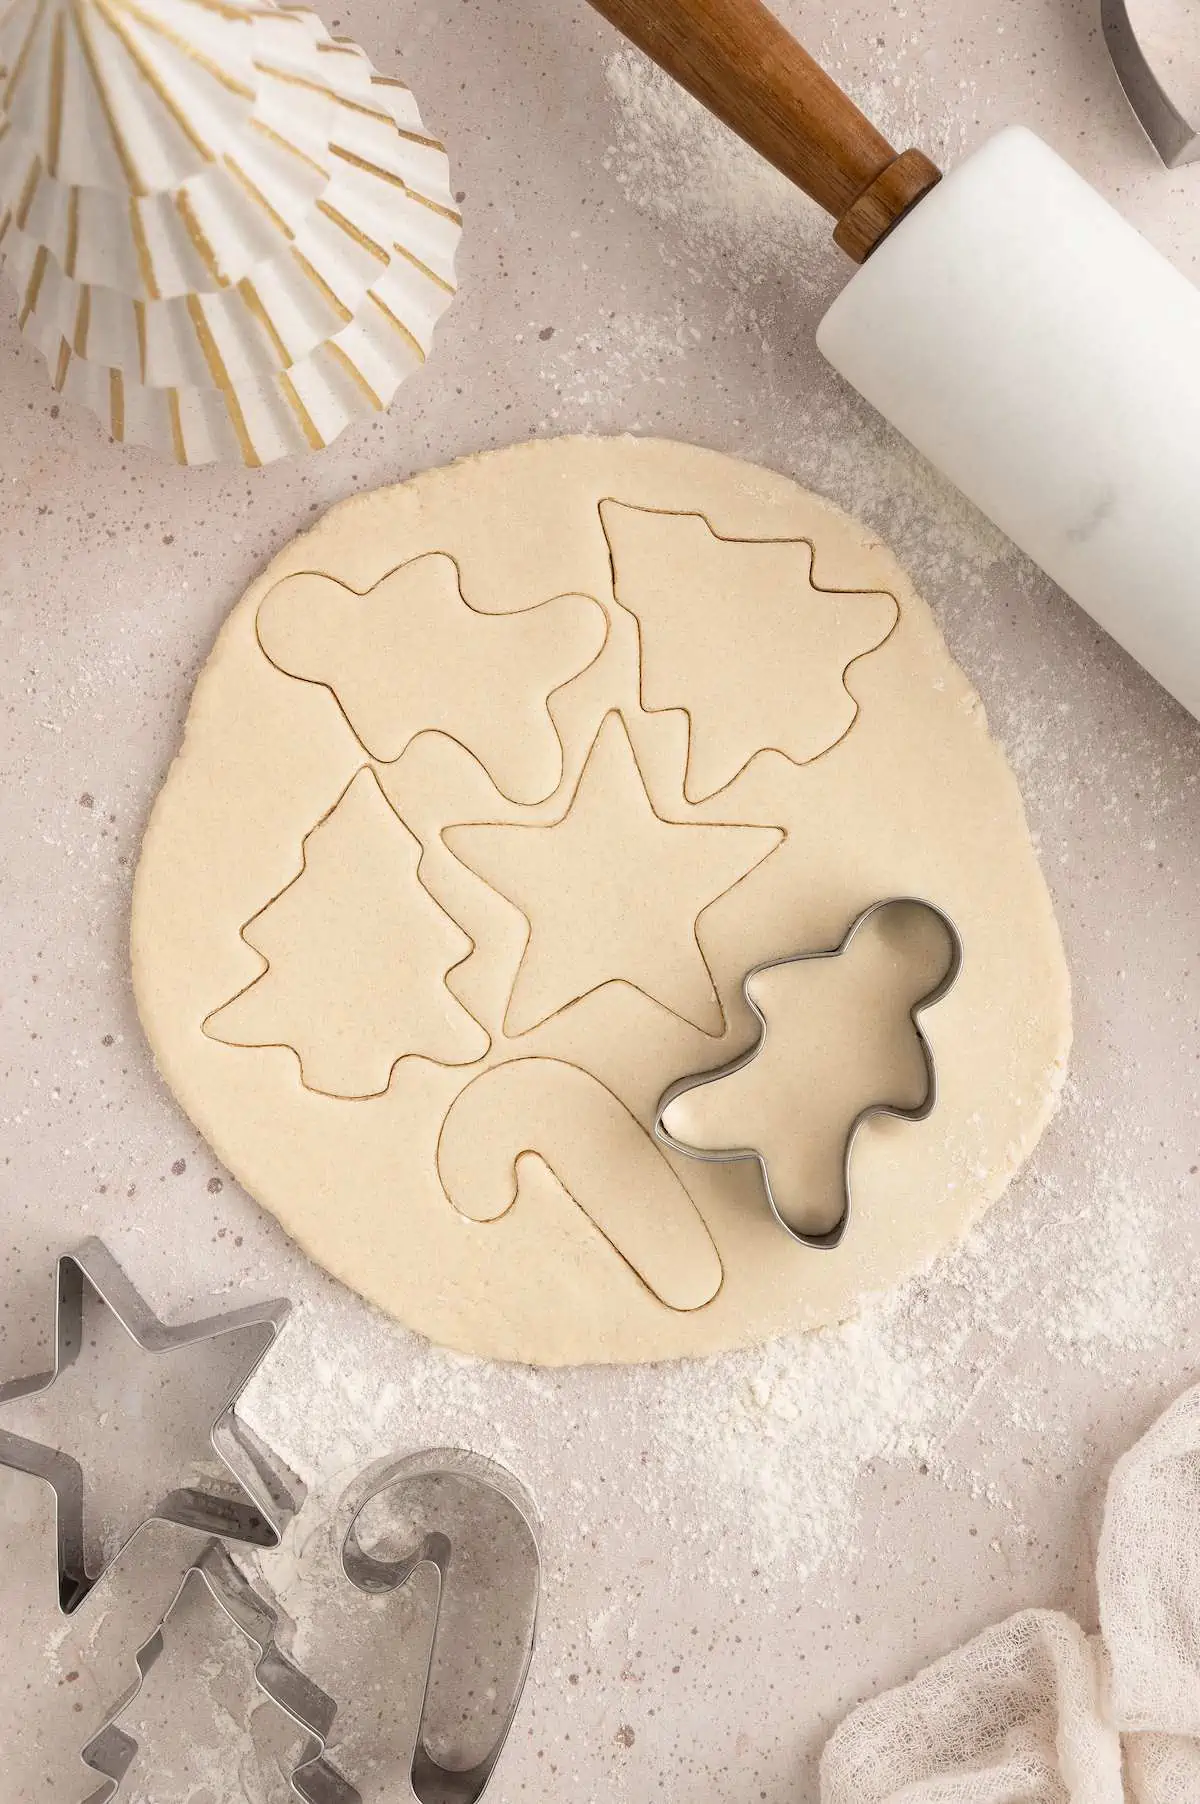
When ready, sprinkle a little flour on the counter top or cutting board and roll out the dough to ¼-inch thickness.
Step 4:
Press cookie cutters into the dough surface, spacing them in a way that allows you to use up as much space as possible. Carefully peel away excess dough and transfer the cut shapes to a parchment lined baking sheet. Continue cutting out ornaments (occasionally reforming dough and rolling it back out when you only have scraps left) and placing them on the baking sheet until all of the dough has been used up.
Step 5:
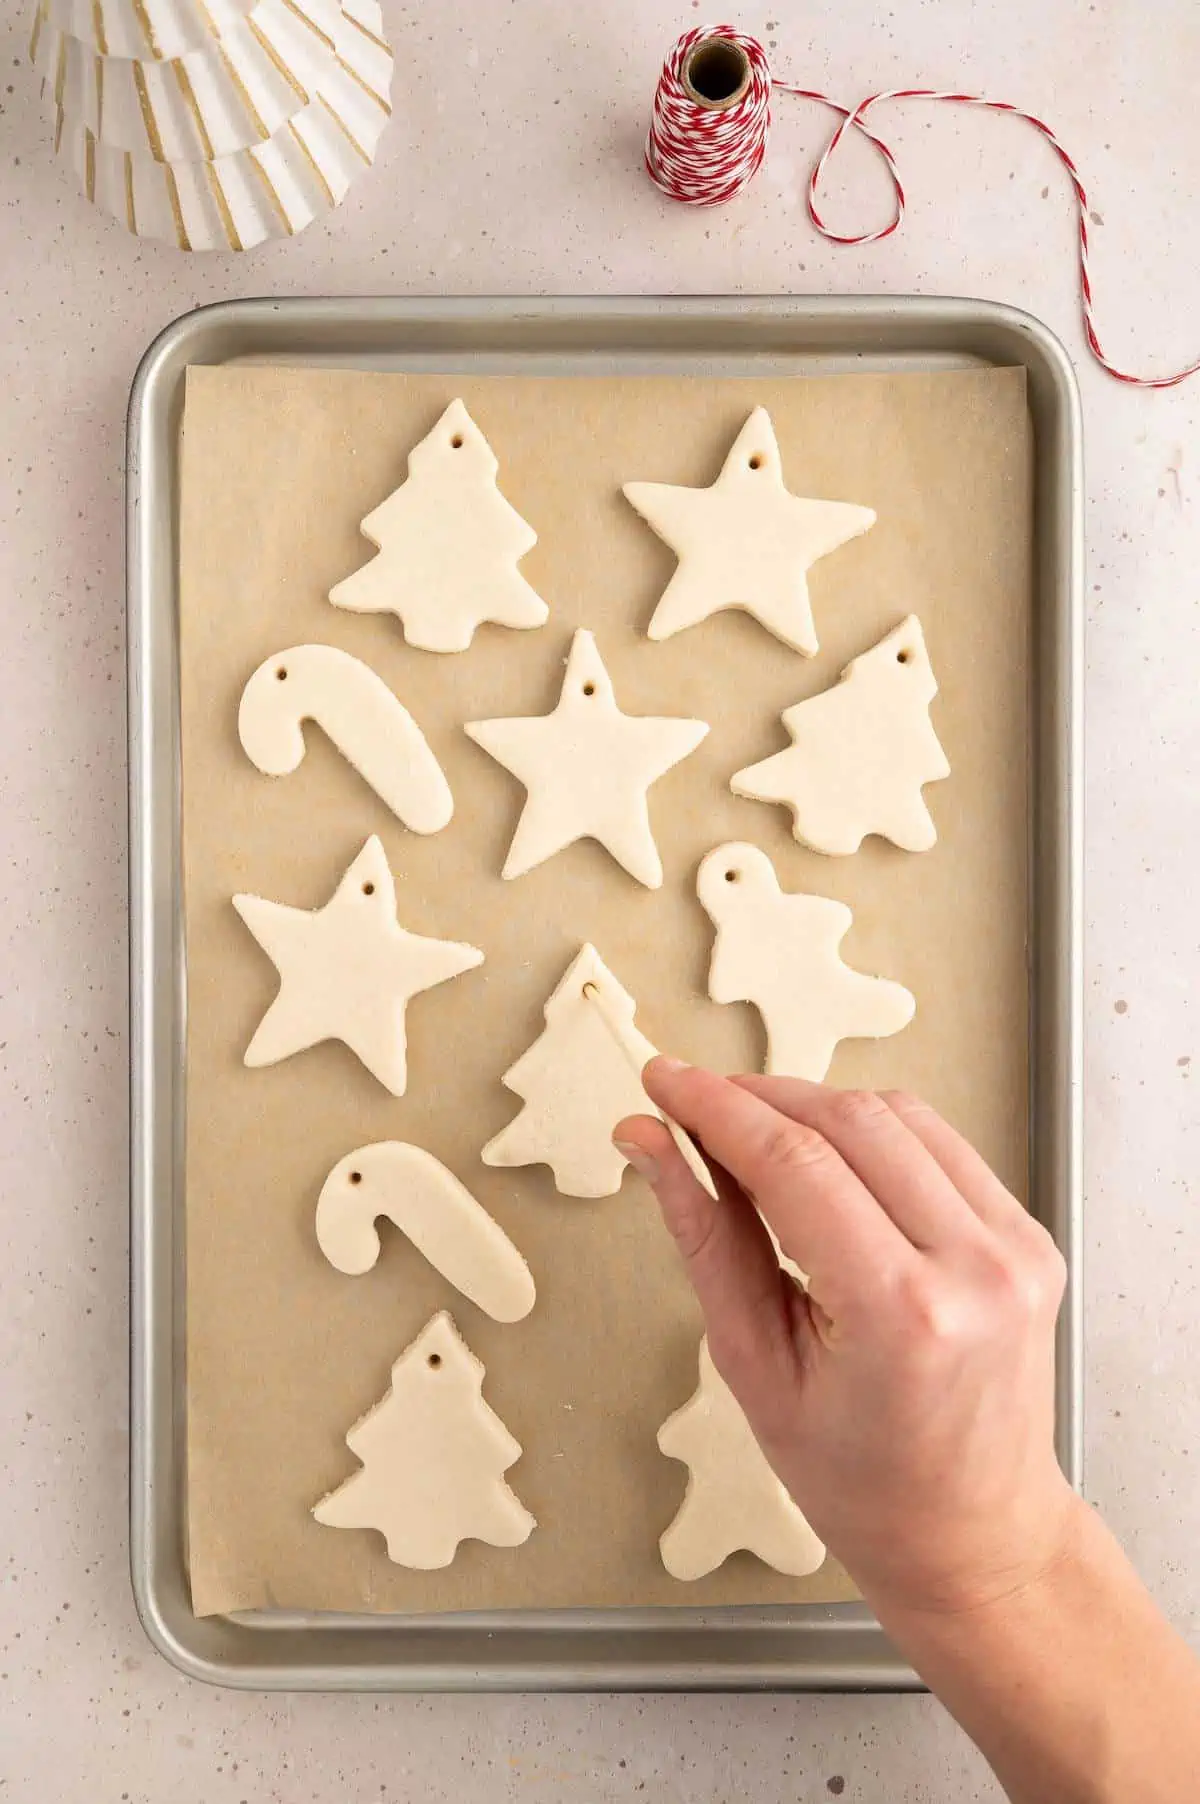
Use a straw or large wooden skewer to make a clearly defined hole near the top of the cut shapes.
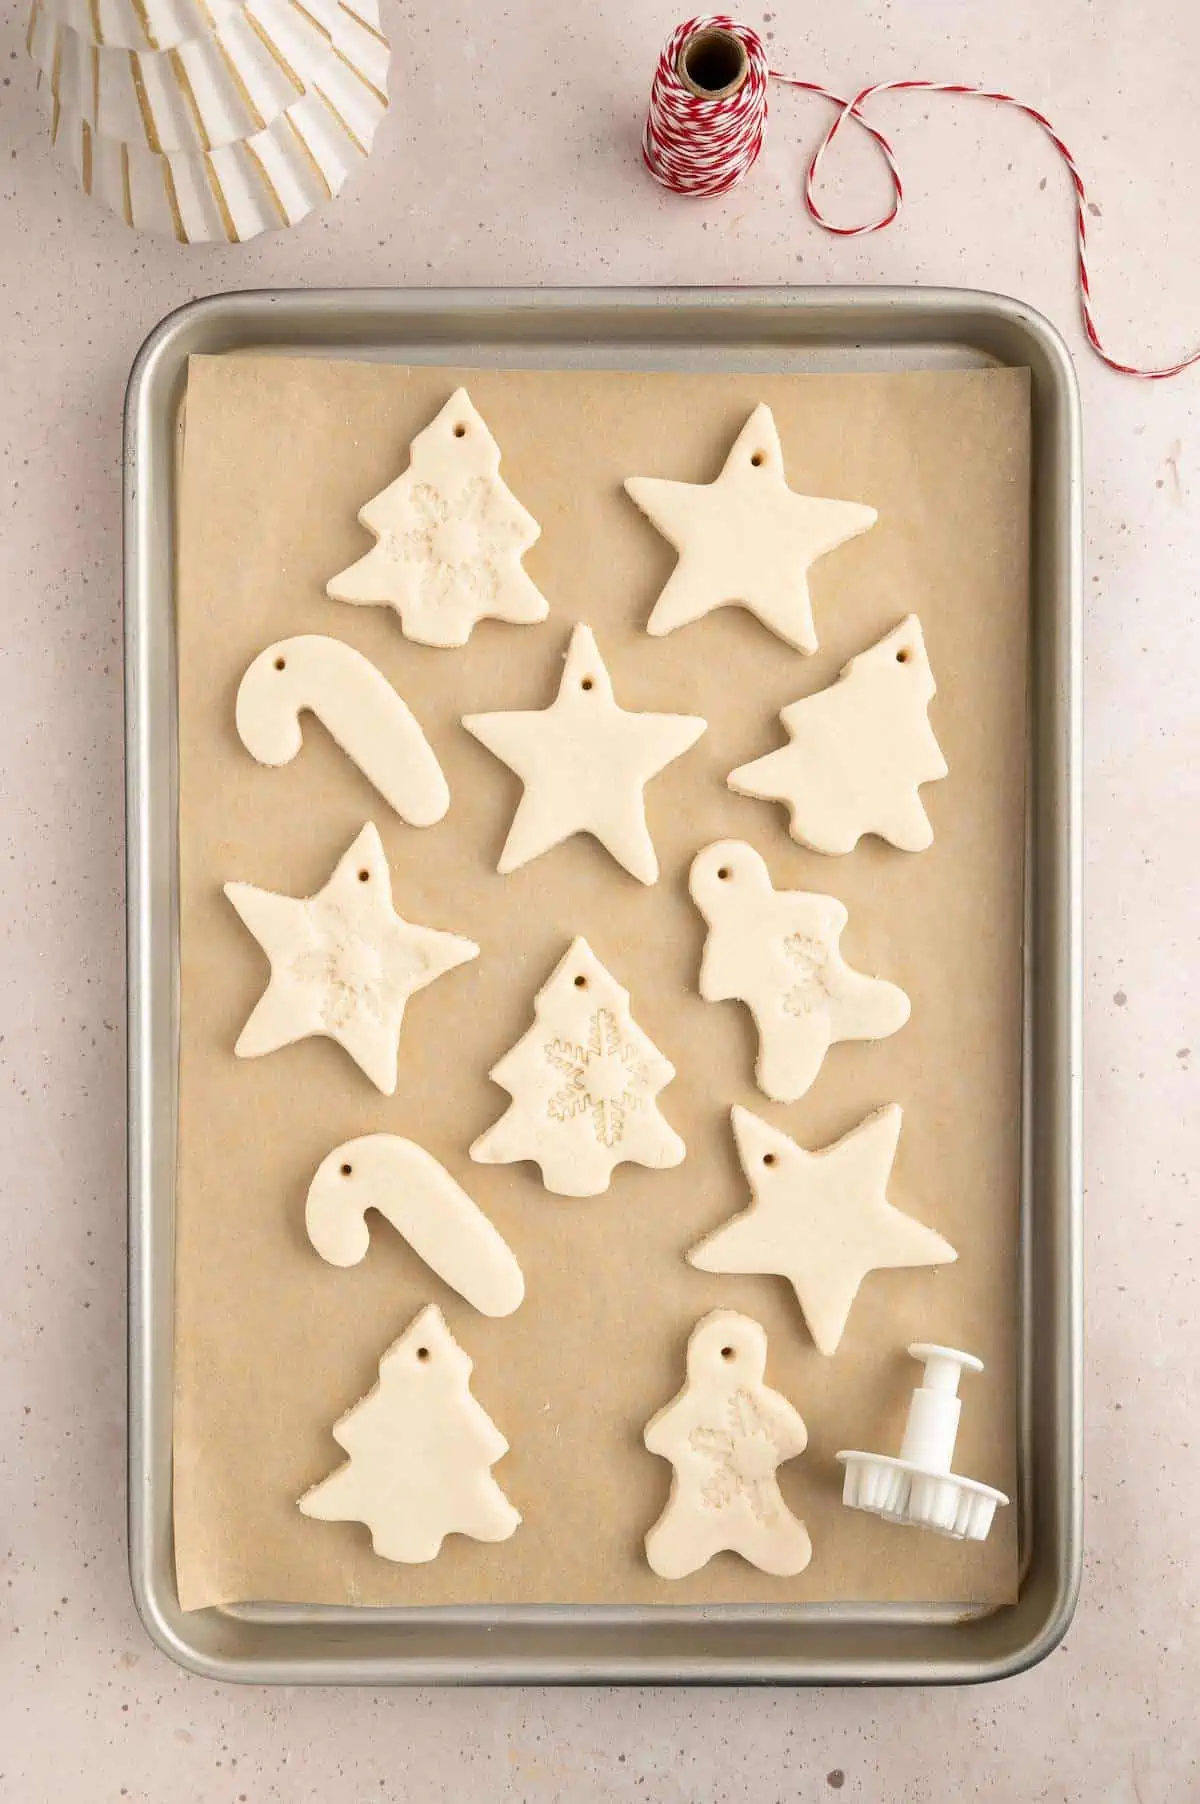
This is also the time to use any stamps or embossing letters if you have them.
Step 6:
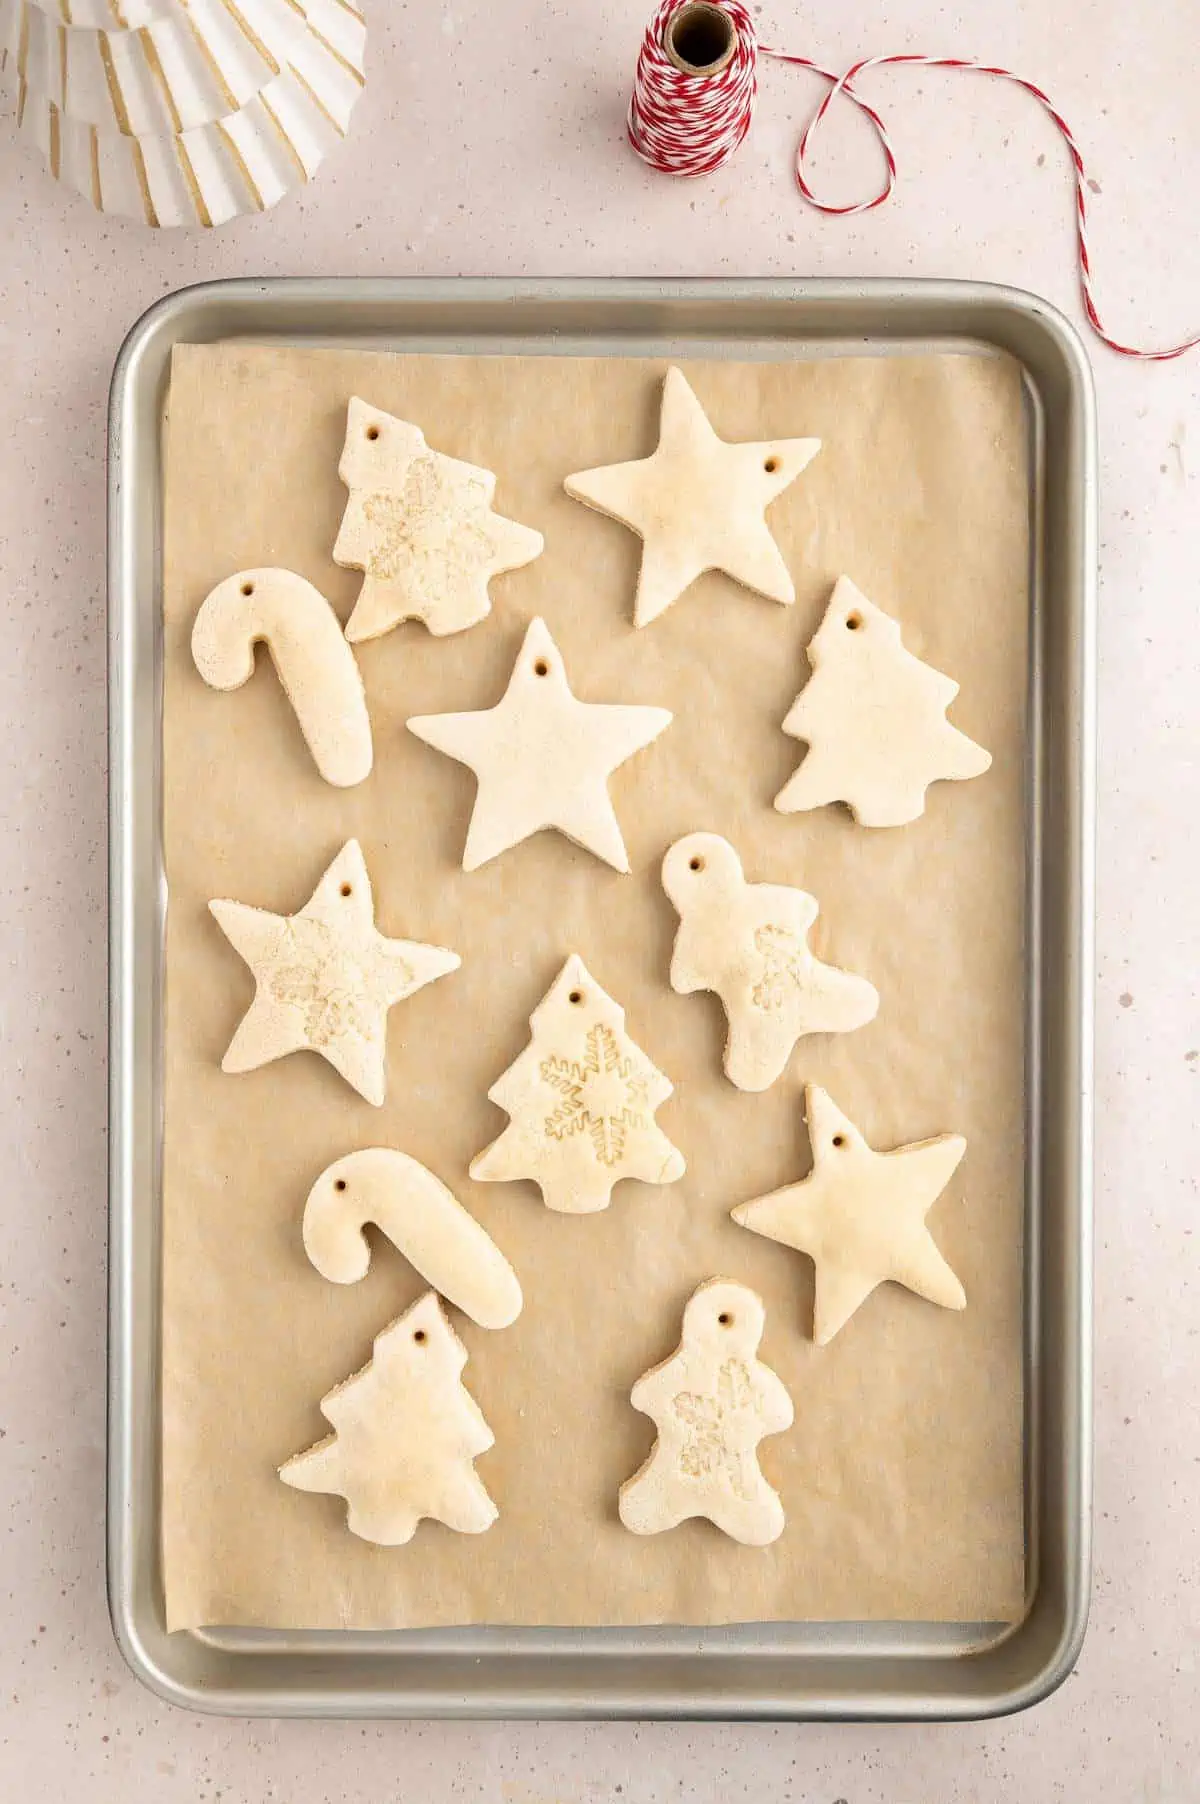
Place on a middle rack of the oven and bake for 30 minutes.
Using a spatula, carefully flip the ornaments over and bake for another 30 minutes or until the shapes feel firm. Depending on your oven, it may take more or less than 30 minutes. Keep checking every 5 minutes or so. Don’t let the ornaments become brown.
Step 7:
Take the baking sheet out of the oven and allow the ornaments to cool completely before removing from the tray.
Step 8:
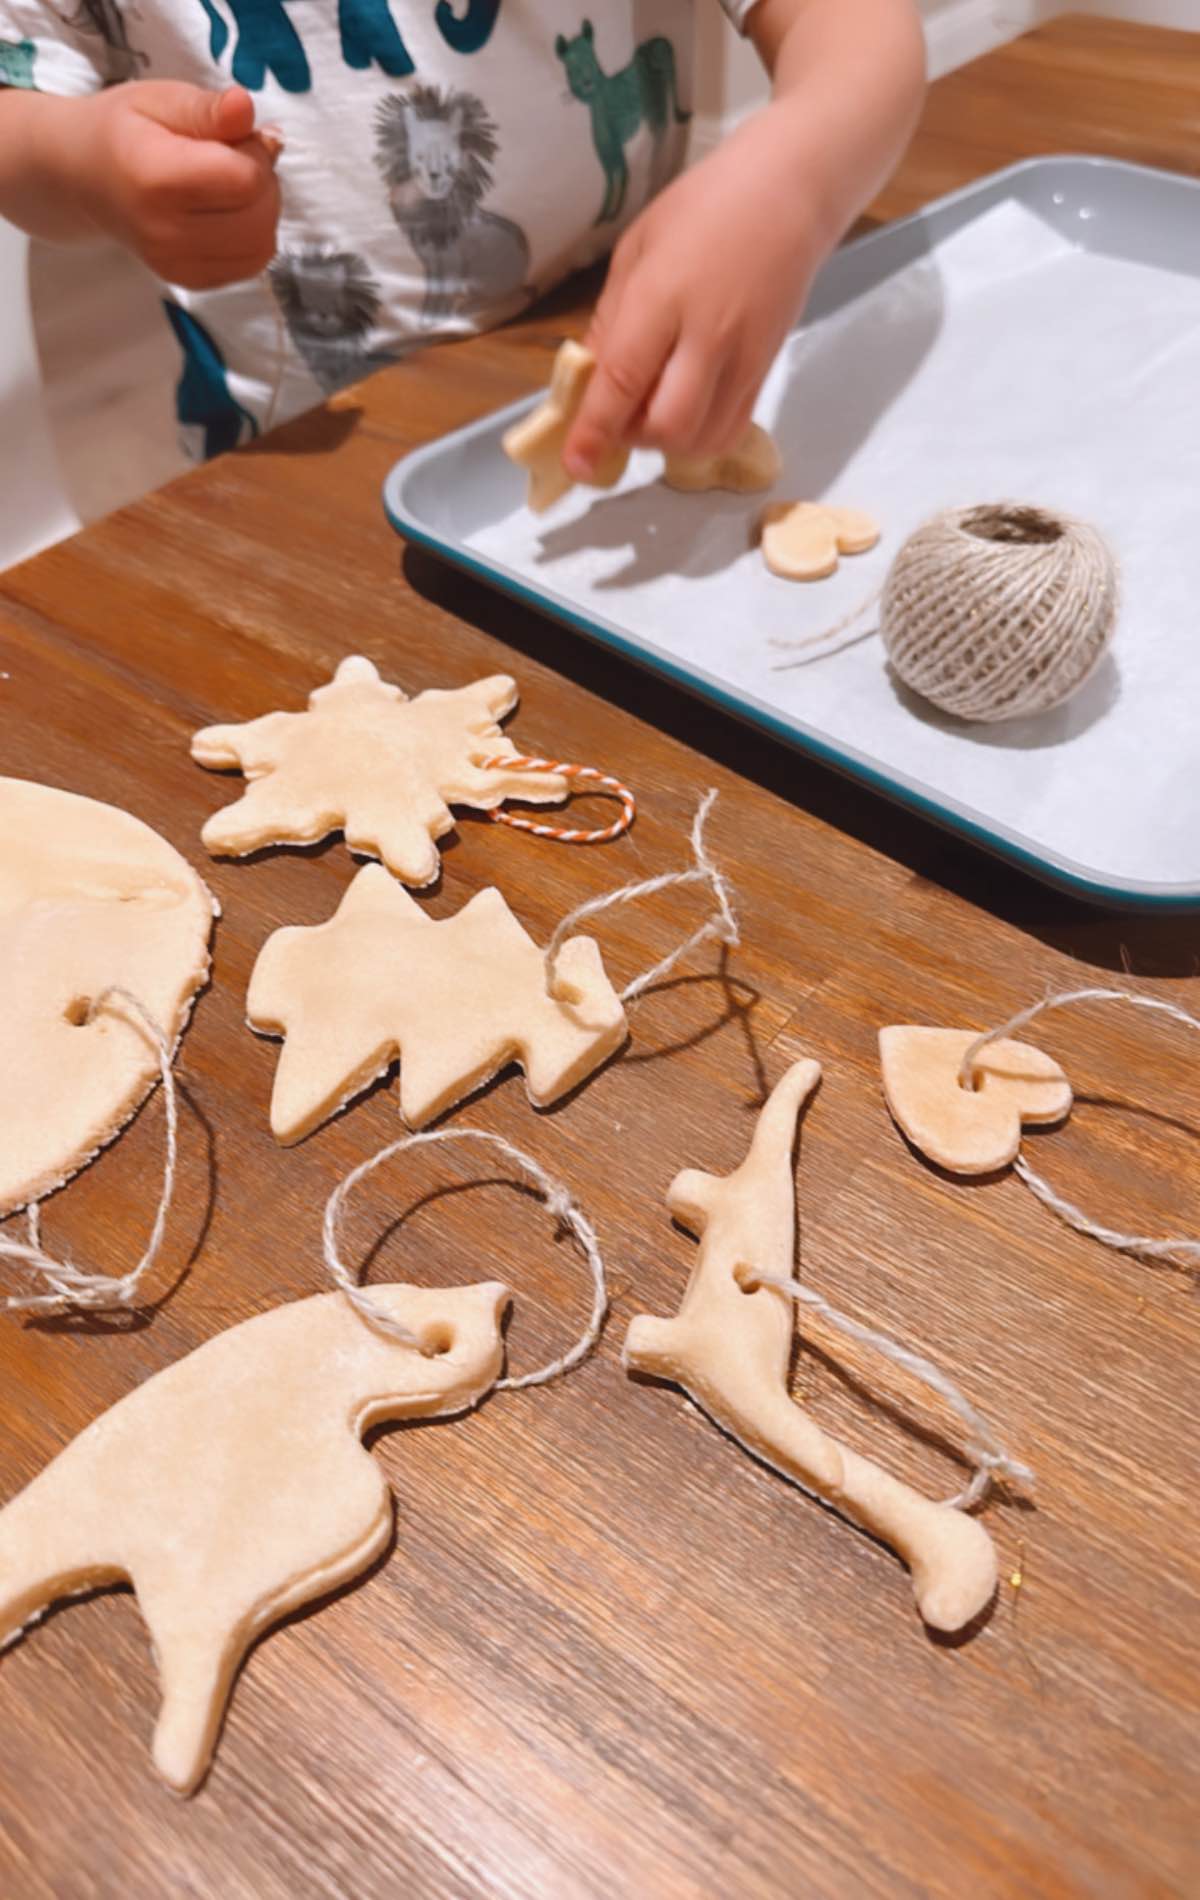
Decorate any way you like (adding paint, glitter, accessories, etc.) and thread a piece of ribbon or string through the top hole of the ornament. Enjoy!
Salt Dough Ornament Q&A
Good question! At higher temperatures, the dough seems to expand a little more easily. To prevent this from happening, use the lowest setting on your oven when baking your ornaments. Also, place them as far away from the heating element as possible. Usually, this means towards the bottom of the oven.
After baking your cut shapes for 30 minutes (at your oven’s lowest temperature), flip them gently and make sure to check them every 5 minutes or so. Some ovens cook more quickly than others.
As an alternative to baking your salt dough ornaments in the oven (or if you do not have an oven), you can allow your ornaments to air dry on parchment paper or wax paper in a place that has low humidity.
This may take from a few days to a week, but they will eventually dry and harden. Make sure to flip the ornaments once per day. If you have the extra time and space, this is a nice way to save on electricity as well.
More Arts & Crafts Ideas and Vegan Recipes for Kids
Being creative can be hard work, so here is additional inspiration for both vegan art supplies and vegan kids’ snacks. Once you’re done filling their minds with amazing art, fill up their bellies with healthy, delicious vegan snacks. These Peanut Butter & Jelly Thumbprint Cookies are an art project and fun food in one recipe—give them a try!
- Vegan Art Supplies
- Homemade Playdough
- Kids Activity Book and Printable Maze
- DIY Summer Camp for Kids
- Vegan Coloring Page
- Are Crayola Markers Vegan?
- Are Crayola Crayons Vegan?
- Cloud Dough
Salt Dough Ornaments
Equipment
- Spatula (for flipping ornaments over)
- Cookie Cutters (any shapes and sizes you wish)
Ingredients
- 2 cups All purpose flour, (plus an extra 1/2 cup for rolling out dough)
- 1 cup Table Salt, (not Kosher salt or other chunkier salts)
- 1 cup Warm Water, (should be a little warmer than room temperature)
- Twine or other string, for hanging the ornaments
Instructions
- Preheat the oven to 200 degrees F or the lowest temperature your oven will go to.
- In a medium to large mixing bowl, add 1 cup of flour, salt, and water. Mix thoroughly using a wooden spoon or your hands. Keep kneading the dough in the bowl for a few minutes. Add a sprinkle of extra flour if the dough is too sticky.
- Once the dough has a soft, mostly dry texture, let the dough sit in the bowl for 20-30 minutes.
- Sprinkle a little flour on the counter top or cutting board and roll out the dough to ¼” thickness.
- Press cookie cutters into the dough surface, making sure to arrange them in a way so that you can use up as much space as possible. Peel away excess dough and carefully add the cut shapes to a parchment lined baking sheet. Continue cutting out ornaments (occasionally reforming dough and rolling it back out when you only have scraps left) and placing them on the baking sheet until all of the dough has been used up.
- Use a straw to make a clearly defined hole near the top of the cut shapes.
- Place on a middle rack of the oven and bake for 30 minutes.
- Using the spatula, carefully flip the ornaments over and bake for another 30 minutes or until the shapes feel firm. Depending on your oven, it may take more or less than 30 minutes. Keep checking every 5 minutes or so. Don't let the ornaments become brown.
- Take the baking sheet out of the oven and allow the ornaments to rest on the baking sheet until completely cool.
- Decorate any way you like (adding paint, glitter, accessories, etc.) and thread a piece of ribbon or string through the top hole of the ornament. Enjoy!
Notes
This salt dough ornament recipe was developed and written by Gina House and edited by Rachel Lessenden. Photos by Amanda McGillicuddy for World of Vegan, all rights reserved.
You may also like...


Enter to Win Our Monthly Giveaway!
Submit your name and email below for a chance to win a new copy of The Friendly Vegan Cookbook! You’ll also receive our free weekly e-newsletter with plant-based recipes, news, vegan coupons, and more. Come back each month for a chance to win new prizes!
Leave a Comment
LOVE!!
Yay we’re so happy to hear that! 🙂
Wow these look so good! And creative
these ornaments are the absolute cutest! can’t wait to whip these up Christmas eve!
These are adorable! Thank you for sharing 🙂
I loved creating these adorable salt dough ornaments! Making a batch each holiday to hang around the house (or even on the rearview mirror!) is so fun. I find it so rewarding to use simple ingredients from the kitchen to make creative, pretty objects 😀
These salt dough ornaments were so fun to make … thanks for all of the amazing ideas!
These salt dough ornaments are a fun and simple activity! Definitely a new favorite tradition for us!
I had so much fun making these with my little one and his friend! We had an ornament making night, and the next day he was so excited to hang them on the tree. Salt dough is amazing, I can’t believe how easy it is to make!
these are so much fun and the perfect holiday activity!
wow i have totally forgotten about these salt dough ornaments! What a throwback and easy way to decorate !
These are so amazing to make with kids! Such a fun Christmas memory.
What a great post! We loved making these! So much fun.
A great idea for kids in the run up to Christmas.